Pages

Sunday, September 10, 2017

Awaiting Ada: Lactation Brownies


And we're back with another "getting ready for baby" post! Today I'm sharing the results of a recent baking experiment.

When The Bird was born, my sweet mama made me a gigantic batch of delicious lactation boosting cookies. Having that little sweet treat ready for me when I needed a pick me up was SO NICE that I knew I wanted to have similar treats ready again this time 'round.

I'd seen the idea of "lactation brownies" floating around, but hadn't found a recipe that I loved. So, I decided to attempt to create my own with my preferred galactagogues - and they worked!

Before I go on, let me answer a few questions you may be asking yourself:
  1. What exactly is a lactation cookie/brownie?
    • Short answer: a treat that helps increase breast milk production or quality
    • More detailed answer: a baked good that includes one or more of a selection of galactagogues, designed to work with your body to amp up milk production (by providing key nutrients or triggers) or to improve the quality of your milk (by boosting your body's stores of needed nutrients)
  2. What on earth is a "galactagogue?"
    • Any substance that helps to increase milk supply. Commonly used galactagogues include: fenugreek, fennel, flax seed, blessed thistle, Goat's Rue, alfalfa, oats, garlic, ginger, cinnamon...and many others.
  3. Do they actually work?
    • It depends on who you ask. Galactagogues work best in conjunction with increasing nursing frequency and milk removal (production is a supply and demand game after all), so they aren't miracle snacks that will just *poof* give you more milk. However, when combined with a change in routine or an increase in pumping frequency, they do tend to provide at least a temporary boost in output!
    • Note, also, that different herb and supplements work differently for different mamas, so you have to find what works for you. For example, I cannot handle fenugreek (probably the most popular herb used in milk-boosting recipes). I respond MUCH better to brewer's yeast! I only know this info through experimentation, however, so I recommend trying different things to see what works for you!
    • In addition, many experts will say that lactation treats are too full of "bad for you" things to do any real good...but I consider a mood boost a good thing, so... #bringonthetreats!
    • At the end of the day, they may work, they may not. But they're yummy and have at least SOME good for you things packed into them, so I'm calling it a newborn haze win!
Now that we've cleared some of that up, let's move on to the recipe! As I mentioned above, I have a preferred set of supplements that I found work for me, so those are what I've used in this recipe. Hopefully they work for you, too, but feel free to play around with others if you have some different herbs you prefer!

The Ingredients
  • I need things to be "going on 2 hours of sleep" easy, so I start with a boxed brownie mix - just pick your favorite kind provided it's the 9x13 pan size!
  • I then add my favorite supplements: 
    • Brewer's Yeast: full of protein, iron, B vitamins, and phytoestrogens; also helps boost energy and mood
      • Note: will give your treats a slightly bitter taste, but I kinda like it
    • Ground Flax Seed: contains good essential fatty acids
    • Steel Cut Oats: good source of iron and protein; plus, the saponins tell the pituitary gland to help make more milk
    • Cinnamon: no clue why it works, but it's yummy
    • Cocoa Mocoa Powder: made from ancient grain protein (amaranth, quinoa, and pea), some coconut, and come coffee flour, it's a nice protein boost that also packs a yummy flavor punch. 
  • I also bump up the chocolate a little with some dark chocolate cocoa powder, dark chocolate chips, and vanilla (which does A LOT to highlight the chocolate). 
  • Then, I add in butter (the real stuff, y'all), coconut oil, egg yolks, and water. 

This produces a rich, semi-dense, chewy yet fudgey brownie, which is my preference. If you prefer your brownies to be more cake like, replace the oil with butter and use whole eggs! I played around with the ratios on this a few times and this recipe seems to result in the best texture for what I like.

I made up a couple of large batches, wrapped them in plastic wrap in bundles of two, and popped them in the freezer. They should keep for a good while that way (and be easy to grab and enjoy whenever I need them).

Treats like this aren't designed to be eaten in large quantities or on a regular basis (as you don't want to OVER do it and end up in pain). However, one or two a day when you need the occasional boost should do the trick. 

If you try these, I'd love to hear your thoughts! Let me know if you made changes or what worked for you!


Double Dark Chocolate Lactation Brownies


Ingredients

  • 1 box brownie mix
  • 1/4 cup brewer's yeast
  • 1/4 cup ground flax seed
  • 1/2 cup steel cut oats (I use the "quick cook" variety or pre-soak them)
  • 2 tbsp dark cocoa powder
  • 2 tbsp Cocoa Mocoa powder (optional)
  • 1 tbsp cinnamon
  • 1/4 cup butter, melted
  • 1/4 cup coconut oil, melted
  • 1 tbsp vanilla
  • 1/2 cup water
  • 2 egg yolks, room temperature

Directions

  • Preheat your oven to 350F and prepare a 9x13 pan by spraying with non-stick spray or lining with parchment paper. 
  • In the bowl of a stand mixer, combine the brownie mix, brewer's yeast, flax seed, oats, cocoa powders, and cinnamon. 
  • Add in the melted butter, coconut oil, vanilla, and water, mixing on low to combine. Add in the yolks, one at a time and mix again on low til combined. Batter will be thick.
  • Pour batter into prepared pan and smooth out. 
  • Bake for 28 min - do not overbake!
  • Allow to cool before slicing, then cut into 15-16 squares. 

Enjoy!

Sunday, September 3, 2017

Awaiting Ada: Labor Prep


Oh hey, y'all. It's been a minute, huh? Pregnancy got the most of me this time around, but I'm finally feeling back up to writing a bit. As I dip my toes back in to the blog world, I thought I'd share a bit about our last minute prep before Little Miss makes her appearance.

Sound good? Good. Here goes...

So, I’m going to try for a med-free labor this time around. I’m crazy, I know. But there are…extenuating circumstances (a story for another time, but it’s mainly concern over how my intestines will react to labor and wanting to feel how much strain I’m putting on my body).

To get ready, I’ve been reading up on calming techniques and how to manage pain without meds. As has happened more and more since The Bird was born, I keep coming back to essential oils. I have loved creating custom blends and balms for baby girl when she needs it, so why not try it for myself?

I kept my bag of tricks relatively simple: some smelling salts, some compress sprays, and some after-care products. I’m excited to see how these fare in the fray of things, but I have high hopes! Below is a quick recap of my stash.


Smelling Salts

Why Salts? 
I wanted some form of inhalant (since most of the benefits you get from oils is due to their aromatic qualities), and smelling salts are particularly suited to help with labor as they encourage deeper breathing. They stimulate your nasal passages and trigger the inhalant reflex, meaning you breathe deeper as you sniff – increasing oxygen flow and alertness!

Basic Recipe: Epsom Salts, Sea Salt, and Essential Oil Blends


My Choices:
  • “Calm” Blend: Lavender + Chamomile + Lemon
    • Plan to use it early, to keep anxiety and nerves at bay. Also anticipate it being useful later when sleep is fleeting
  • “Energize” Blend: Peppermint + Orange
    • Plan to use it when I’m feeling exhausted, weak, or just done with the whole process
  • “Ouch” Pain Relief Blend: Lavender + Bergamot + Frankincense
    • Plan to use it when contractions get intense and I need to remember to breathe

Compress Sprays

Why Sprays? 
Warm compresses have been a go-to this pregnancy, and I’m hoping they’ll continue to prove useful during labor. I’m packing several washcloths and will have The Boy run them under warm (or cool) water then spritz them with the appropriate blend when I need some relief. They’ll also be good for spritzing on my back for counter-pressure massage.

Basic Recipe: Carrier Oil, Witch Hazel, and Essential Oil Blends


My Choices:
  • “Breathe Baby” Labor blend: Lemon + Bergamot + Chamomile
    • To use with cool compresses on the back of my neck when I’m losing steam or need a break (should encourage alertness and calm)
  • “Cramp Calm” Labor blend: Lavender + Bergamot + Frankincense
    • To use with warm compresses on my belly when contractions are intense (should be calming and provide some pain relief)
  • “Push Prep” Labor blend: Geranium + Helichrysum 
    • To use with warm compresses as I prepare to push (should provide pain relief and has skin healing & repairing benefits)
  • “Peri Pamper” Aftercare blend: Frankincense + Lavender + Helichrysum
    • To use post-labor to soothe, heal, and tone 

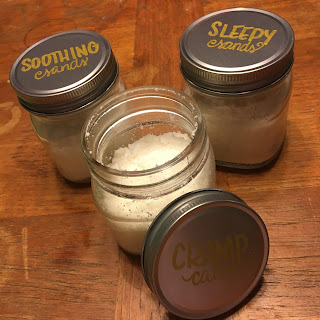
Bath Sands

Why Sands? 
Because bath balls require a mold and drying time. But really, the sands allow me to customize how much I scoop into a bath depending on what I need. I plan on using these once home from the hospital as I heal and recover.

Basic Recipe: Baking Soda, Citric Acid, Arrowroot Powder, Epsom Salts, Coconut Oil, Witch Haze, and Essential Oil Blends


My Choices:
  • “Cramp Calm” Cramping/Pain Relief Blend: Lavender + Bergamot + Frankincense
    • For those early days when everything still hurts like crazy
  • “Soothing Sands” Healing Blend: Frankincense + Lavender + Helichrysum
    • To help tone, soothe, and heal 
  • “Sleepy Sands” Calming Blend: Lavender + Chamomile + Vanilla
    • To help calm nerves and anxiety and encourage restful sleep (also, it’s toddler friendly!)

Bonus Item: Peri Prep Balm

Basic Recipe: Evening Primrose Oil, Shea Butter, Beeswax, and Essential Oils (Geranium + Frankincense)


This is a pre-labor item I plan to start using next week (around week 36). It's designed to to help prepare the body for labor by building skin elasticity and can prompt dilation.

Now, I feel compelled to add: I am NOT an aromatherapist and cannot vouch for any of the above as legitimate. I do have a good friend who is a certified RA, and I consult with her regularly as I mix and use oils. I recommend finding a source of information you trust and reading up on oils and their uses before jumping in. I’ve done TONS of research over the past year and I had no clue how much I didn’t know! Only certain oils are safe for different ages/conditions/uses, and it’s important to use them with caution. I share this in case others find it interesting, but with that disclaimer: do your own research!

I’ll report back with how all of this goes – could be a rousing success, could be that I don’t even touch them at the hospital. We’ll see!

Getting SO excited to meet this baby girl! Can’t wait to tell y’all all about it!

Wednesday, January 18, 2017

What's In My (Diaper) Bag?


Once upon a time I wrote a post about all of my diaper bag favorites. I never got around to editing and publishing it, however, and now many of my favorites have changed.

See, that original post was written when The Bird was, oh, about 4 months old. Now she’s a walking, talking, exploring, busy ball of energy and my favorites have had to change to keep up a bit.

We recently received a new diaper bag (thanks to the CheekyTummy Brand Ambassador program), and I LOVE it. It has fantastic pockets, is super easy to pack, has versatile carry options, and is adorable.

As I was packing the bag up to try it out, I remembered that long forgotten post and decided to update it! I thought y’all might enjoy seeing some of our “must haves” and favorites, and I’d love to hear what you can’t live without, too!

So, without further ado, here it is...


What’s In My Bag:


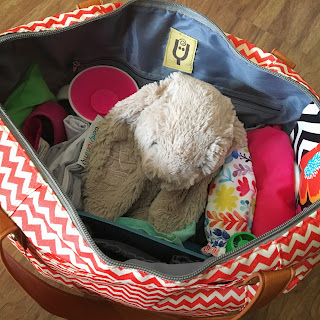
Let’s start with the bag itself. We have THIS ONE from Cheeky Tummy. 


As you can see, the pockets are fantastic (y'all...pocket people are my people). There are:
  • two large outside pockets
  • three large inside pockets
  • one insulated pocket
  • one mesh pocket
  • one small paci pouch, and
  • one large zipper pocket
Not only do they make organizing the bag a snap, they’re very well thought out – the insulated pouch is great for her cup, we keep emergency snacks in the mesh pouch (easy to grab), the paci pouch can be easily wiped down/disinfected when needed, the changing pad fits perfectly in the zip pouch, and the outside pouches work great for storing the extra bag straps and my stuff (phone, wallet, keys). 

Have I mentioned I like pockets…because I might have a problem…

Now, on to what we keep inside the bag!

Next, on the left, we have what I like to call our “Hanger Prevention" Stuff (toddler mamas, feel me?):


  • ezpz Mini Mat: with a toddler who still prefers eating with her fingers directly off the table, this is a lifesaver at restaurants. Suctions to the table and rinses off easily!
  • CheekyTummy Multipurpose Cover: this cover has so many uses: nursing scarf, carseat cover, shopping cart cover, and (my favorite) high chair cover. See messy toddler above – we love having a way to keep the mess somewhat confined.
  • Ella’s Kitchen pouches & snacks: I have a love affair with Ella’s. We avoid any added sugar with The Bird’s snacks, and Ella’s does a great job of offering a wide, yummy line that satisfies a busy toddler without sugar! Our favorites are the Nibbly Fingers and Ginger Cookies.
  • Munchkin snack cup: because apparently you can’t ride in a car seat without a supply of puffs or dry cereal
  • NumNum spoon: we did BLW (baby led weaning) with The Bird and accidentally created a stubbornly independent eater. These little spoons make it easier for her to feed herself, even pureed things! (Note: ours are hard to find, but these are similar)
  • Munchkin Miracle 360 cup: The Bird is oddly particular about her cups, and this is the only one she likes. We have several variations and I love how easy they are to clean (no straws or spouts or valves for yucky stuff to get stuck). Plus, it’s easy for her to navigate (she can drink from any point on the rim, just like a regular cup), it doesn’t spill or leak (!!!), and it’s better for her little developing mouth. 
  • Boon SNUG: I keep one of these stashed in the bag for those “We left the cup in the car” moments. It fits on practically any cup and turns it into a spill-proof sippy.
  • OXO Tot roll up bib (and spoon): I like that this bib is silicone and fabric, making it easy to rinse post-meal, it has a pocket for catching the things she drops, and it rolls into itself for easy storage. We keep a spoon tucked inside it, just in case.

Then, we have our “Toddlers Are Walking Messes" Stuff:


  • Changing pad: we love the one that came with the bag – yay!
  • Planet Wise wet bag: we use this brand because it’s a PUL/fabric combo bag, meaning the mess/wet stays inside and the outside stays dry and clean (no leaking or dampness). Plus, they’re super durable and easy to wash.
  • Cloth Diapers: I have SO MANY THOUGHTS on cloth diapering that I won’t share here, but you can check out my primer posts (here, here, here, here, and here) if you’re interested. We carry around 2-3 when we’re out, just in case. By the way, the floral design is a LilyBee – made my a friend of mine – and it’s wonderful. If you’re interested, let me know and I can get you connected!
  • Huggies Natural Care wipes: we use cloth wipes at home, but while out, these are simpler. I’ve tried several brands and just keep coming back to Huggies. They’re thicker, more durable, unscented, and just work better.
  • Kleenex To Go: these are mostly for me, for The Bird we use...
  • Boogie Wipes: lifesavers, these are. Y’all, really, WHERE DOES ALL THE SNOT COME FROM? Her head is only so big. I do not understand. We buy in bulk.
  • GermX: because aforementioned toddler and snot

And finally, sticking with the theme above, our “Inevitable Breakdown Solution" Stuff (because #whineyearold):


  • Swaddle Designs blanket: I know everyone is familiar with Aden+Anais, but this brand is hands down my favorite swaddle. They’re big and cushy and way softer than any AA I have. Plus, the prints are lovely.
  • Bunny: this is The Bird’s baby. It’s a JellyCat bunny personalized via Peek-A-Whoo.
  • Change of clothes: the diva dislikes being wet, but has zero qualms about getting wet…so…
  • Amazon Fire: we have a Curious George addiction, y’all. It’s bad. She’s in love. I don’t like her having the tablet on too often, but on occasion, it’s the only thing that works and you do what you gotta do.
  • MAM paci: yes, we still have a paci. I like sleeping. I’m balancing it out with the rimless cup, right? Right.
  • Glow sticks: my MIL figured this trick out – The Bird thinks these are THE BEST THING EVER! In an emergency, we pull one out, crack it, and insta-calm. They’re like baby crack. Walmart sells them in big bags, just sayin'.

I think that covers it all. We’re in the throes of #ToddlerLife, so needs change daily depending on The Bird’s mood and preferences, but these are our regularly rotated staples.


Now, if you’ll excuse me, someone is currently emptying out the prettily packed bag all over the living room floor. Thanks for reading and let me know what all you have to have in YOUR bag!

Sunday, January 8, 2017

January Meal Plan Recipes


Explanation for this post in the form of a life update:
  • The Bird is now 16 months and NEVER SITS STILL. She’s exploding with words, energy, and mischief. She’s constantly hungry and/or eating, but is still wearing 12M clothes. She’s in love with Curious George and learning faster than I can teach her.
  • The Boy is in the dissertation writing stage of his PhD, so any time he has that he’s not chasing a toddler, he’s writing or reading or researching. He’ll also be teaching this semester and is working on OU’s retention committee part time.
  • I’m tutoring two days a week, serving as the nursery coordinator for our church (managing 100+ volunteers), babysitting two days a week, doing Montessori early learning with The Bird, and running A Double Batch (my cookie business) out of the house.

So, you might say we’re kinda busy.

And, since the cooking and cleaning fairies have yet to find our house, meals around here require a bit of planning so they don’t all end up being Goldfish crackers, a spoonful of peanut butter, and thrice reheated coffee at 9 pm.

Meal Planning has become my best friend. I plan out our meals for the month, make a GIGANTIC shopping list, and spend one weekend shopping, chopping, slicing, measuring, packing, and prepping. It’s a long process (and a decent cash outlay up front), but I end up with 30 lunches and dinners out of it, so it’s worth it. Plus, it’s less thinking on a daily basis, fewer trips to the store each week, and I can monitor exactly what goes into our food.

We cook in our slow cooker A LOT (we have this one, and it’s amazing), but we also have some favorite stovetop or oven recipes. Breakfast is simple staples (oatmeal, avocados, eggs, toast) and lunch is frequently leftovers from the night before. For dinner, I keep the sides simple (salads, frozen broccoli, green beans, brown rice). We've learned over time what we love, what works, and what kind of recipes to trust. 

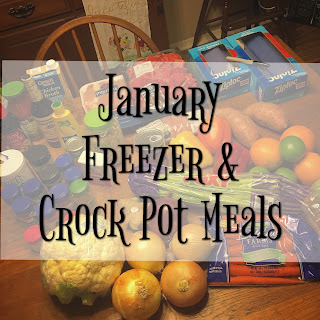
I posted the following photo a few nights ago and had quite a few folks express interest in what recipes I use, so I figured I'd share! 


This is how it looks at the beginning. Once I’ve shopped and collected ingredients, I outline all of my recipes in a spreadsheet (I’ll link my file for this month below). I then spend a chunk of time chopping, slicing, dicing, peeling, etc. so that all I have to do is dump ingredients into freezer bags or combine in pans.

I usually start with my crock pot bags. I line up my ziplocks, add the protein to each one, add seasonings next, then veggies, and wrap up with liquid. A lot of the recipes use similar ingredients, so use the excel sheet so that I only have to grab each ingredient once (i.e. I add salt to each bag at the same time, then pepper, then ginger, etc). I’ve found working down the list like that to save me time. I then put together the meals that require a bit more prep.

We store our meals in our chest freezer, and I get the next day’s meal out the night before to thaw in the refrigerator.

I’ve adapted many of these recipes to feed a family of 2-3, but you can easily double them. Most of these we’ve tried before and love, but a few are new. I’m planning to review each one and do a follow-up post at the end of the month!


So, without further ado, here are my recipes! Hope they’re helpful to some of you! I’d love to answer any questions or offer tips, just let me know!