Pages

Sunday, September 10, 2017

Awaiting Ada: Lactation Brownies


And we're back with another "getting ready for baby" post! Today I'm sharing the results of a recent baking experiment.

When The Bird was born, my sweet mama made me a gigantic batch of delicious lactation boosting cookies. Having that little sweet treat ready for me when I needed a pick me up was SO NICE that I knew I wanted to have similar treats ready again this time 'round.

I'd seen the idea of "lactation brownies" floating around, but hadn't found a recipe that I loved. So, I decided to attempt to create my own with my preferred galactagogues - and they worked!

Before I go on, let me answer a few questions you may be asking yourself:
  1. What exactly is a lactation cookie/brownie?
    • Short answer: a treat that helps increase breast milk production or quality
    • More detailed answer: a baked good that includes one or more of a selection of galactagogues, designed to work with your body to amp up milk production (by providing key nutrients or triggers) or to improve the quality of your milk (by boosting your body's stores of needed nutrients)
  2. What on earth is a "galactagogue?"
    • Any substance that helps to increase milk supply. Commonly used galactagogues include: fenugreek, fennel, flax seed, blessed thistle, Goat's Rue, alfalfa, oats, garlic, ginger, cinnamon...and many others.
  3. Do they actually work?
    • It depends on who you ask. Galactagogues work best in conjunction with increasing nursing frequency and milk removal (production is a supply and demand game after all), so they aren't miracle snacks that will just *poof* give you more milk. However, when combined with a change in routine or an increase in pumping frequency, they do tend to provide at least a temporary boost in output!
    • Note, also, that different herb and supplements work differently for different mamas, so you have to find what works for you. For example, I cannot handle fenugreek (probably the most popular herb used in milk-boosting recipes). I respond MUCH better to brewer's yeast! I only know this info through experimentation, however, so I recommend trying different things to see what works for you!
    • In addition, many experts will say that lactation treats are too full of "bad for you" things to do any real good...but I consider a mood boost a good thing, so... #bringonthetreats!
    • At the end of the day, they may work, they may not. But they're yummy and have at least SOME good for you things packed into them, so I'm calling it a newborn haze win!
Now that we've cleared some of that up, let's move on to the recipe! As I mentioned above, I have a preferred set of supplements that I found work for me, so those are what I've used in this recipe. Hopefully they work for you, too, but feel free to play around with others if you have some different herbs you prefer!

The Ingredients
  • I need things to be "going on 2 hours of sleep" easy, so I start with a boxed brownie mix - just pick your favorite kind provided it's the 9x13 pan size!
  • I then add my favorite supplements: 
    • Brewer's Yeast: full of protein, iron, B vitamins, and phytoestrogens; also helps boost energy and mood
      • Note: will give your treats a slightly bitter taste, but I kinda like it
    • Ground Flax Seed: contains good essential fatty acids
    • Steel Cut Oats: good source of iron and protein; plus, the saponins tell the pituitary gland to help make more milk
    • Cinnamon: no clue why it works, but it's yummy
    • Cocoa Mocoa Powder: made from ancient grain protein (amaranth, quinoa, and pea), some coconut, and come coffee flour, it's a nice protein boost that also packs a yummy flavor punch. 
  • I also bump up the chocolate a little with some dark chocolate cocoa powder, dark chocolate chips, and vanilla (which does A LOT to highlight the chocolate). 
  • Then, I add in butter (the real stuff, y'all), coconut oil, egg yolks, and water. 

This produces a rich, semi-dense, chewy yet fudgey brownie, which is my preference. If you prefer your brownies to be more cake like, replace the oil with butter and use whole eggs! I played around with the ratios on this a few times and this recipe seems to result in the best texture for what I like.

I made up a couple of large batches, wrapped them in plastic wrap in bundles of two, and popped them in the freezer. They should keep for a good while that way (and be easy to grab and enjoy whenever I need them).

Treats like this aren't designed to be eaten in large quantities or on a regular basis (as you don't want to OVER do it and end up in pain). However, one or two a day when you need the occasional boost should do the trick. 

If you try these, I'd love to hear your thoughts! Let me know if you made changes or what worked for you!


Double Dark Chocolate Lactation Brownies


Ingredients

  • 1 box brownie mix
  • 1/4 cup brewer's yeast
  • 1/4 cup ground flax seed
  • 1/2 cup steel cut oats (I use the "quick cook" variety or pre-soak them)
  • 2 tbsp dark cocoa powder
  • 2 tbsp Cocoa Mocoa powder (optional)
  • 1 tbsp cinnamon
  • 1/4 cup butter, melted
  • 1/4 cup coconut oil, melted
  • 1 tbsp vanilla
  • 1/2 cup water
  • 2 egg yolks, room temperature

Directions

  • Preheat your oven to 350F and prepare a 9x13 pan by spraying with non-stick spray or lining with parchment paper. 
  • In the bowl of a stand mixer, combine the brownie mix, brewer's yeast, flax seed, oats, cocoa powders, and cinnamon. 
  • Add in the melted butter, coconut oil, vanilla, and water, mixing on low to combine. Add in the yolks, one at a time and mix again on low til combined. Batter will be thick.
  • Pour batter into prepared pan and smooth out. 
  • Bake for 28 min - do not overbake!
  • Allow to cool before slicing, then cut into 15-16 squares. 

Enjoy!

Sunday, September 3, 2017

Awaiting Ada: Labor Prep


Oh hey, y'all. It's been a minute, huh? Pregnancy got the most of me this time around, but I'm finally feeling back up to writing a bit. As I dip my toes back in to the blog world, I thought I'd share a bit about our last minute prep before Little Miss makes her appearance.

Sound good? Good. Here goes...

So, I’m going to try for a med-free labor this time around. I’m crazy, I know. But there are…extenuating circumstances (a story for another time, but it’s mainly concern over how my intestines will react to labor and wanting to feel how much strain I’m putting on my body).

To get ready, I’ve been reading up on calming techniques and how to manage pain without meds. As has happened more and more since The Bird was born, I keep coming back to essential oils. I have loved creating custom blends and balms for baby girl when she needs it, so why not try it for myself?

I kept my bag of tricks relatively simple: some smelling salts, some compress sprays, and some after-care products. I’m excited to see how these fare in the fray of things, but I have high hopes! Below is a quick recap of my stash.


Smelling Salts

Why Salts? 
I wanted some form of inhalant (since most of the benefits you get from oils is due to their aromatic qualities), and smelling salts are particularly suited to help with labor as they encourage deeper breathing. They stimulate your nasal passages and trigger the inhalant reflex, meaning you breathe deeper as you sniff – increasing oxygen flow and alertness!

Basic Recipe: Epsom Salts, Sea Salt, and Essential Oil Blends


My Choices:
  • “Calm” Blend: Lavender + Chamomile + Lemon
    • Plan to use it early, to keep anxiety and nerves at bay. Also anticipate it being useful later when sleep is fleeting
  • “Energize” Blend: Peppermint + Orange
    • Plan to use it when I’m feeling exhausted, weak, or just done with the whole process
  • “Ouch” Pain Relief Blend: Lavender + Bergamot + Frankincense
    • Plan to use it when contractions get intense and I need to remember to breathe

Compress Sprays

Why Sprays? 
Warm compresses have been a go-to this pregnancy, and I’m hoping they’ll continue to prove useful during labor. I’m packing several washcloths and will have The Boy run them under warm (or cool) water then spritz them with the appropriate blend when I need some relief. They’ll also be good for spritzing on my back for counter-pressure massage.

Basic Recipe: Carrier Oil, Witch Hazel, and Essential Oil Blends


My Choices:
  • “Breathe Baby” Labor blend: Lemon + Bergamot + Chamomile
    • To use with cool compresses on the back of my neck when I’m losing steam or need a break (should encourage alertness and calm)
  • “Cramp Calm” Labor blend: Lavender + Bergamot + Frankincense
    • To use with warm compresses on my belly when contractions are intense (should be calming and provide some pain relief)
  • “Push Prep” Labor blend: Geranium + Helichrysum 
    • To use with warm compresses as I prepare to push (should provide pain relief and has skin healing & repairing benefits)
  • “Peri Pamper” Aftercare blend: Frankincense + Lavender + Helichrysum
    • To use post-labor to soothe, heal, and tone 

Bath Sands

Why Sands? 
Because bath balls require a mold and drying time. But really, the sands allow me to customize how much I scoop into a bath depending on what I need. I plan on using these once home from the hospital as I heal and recover.

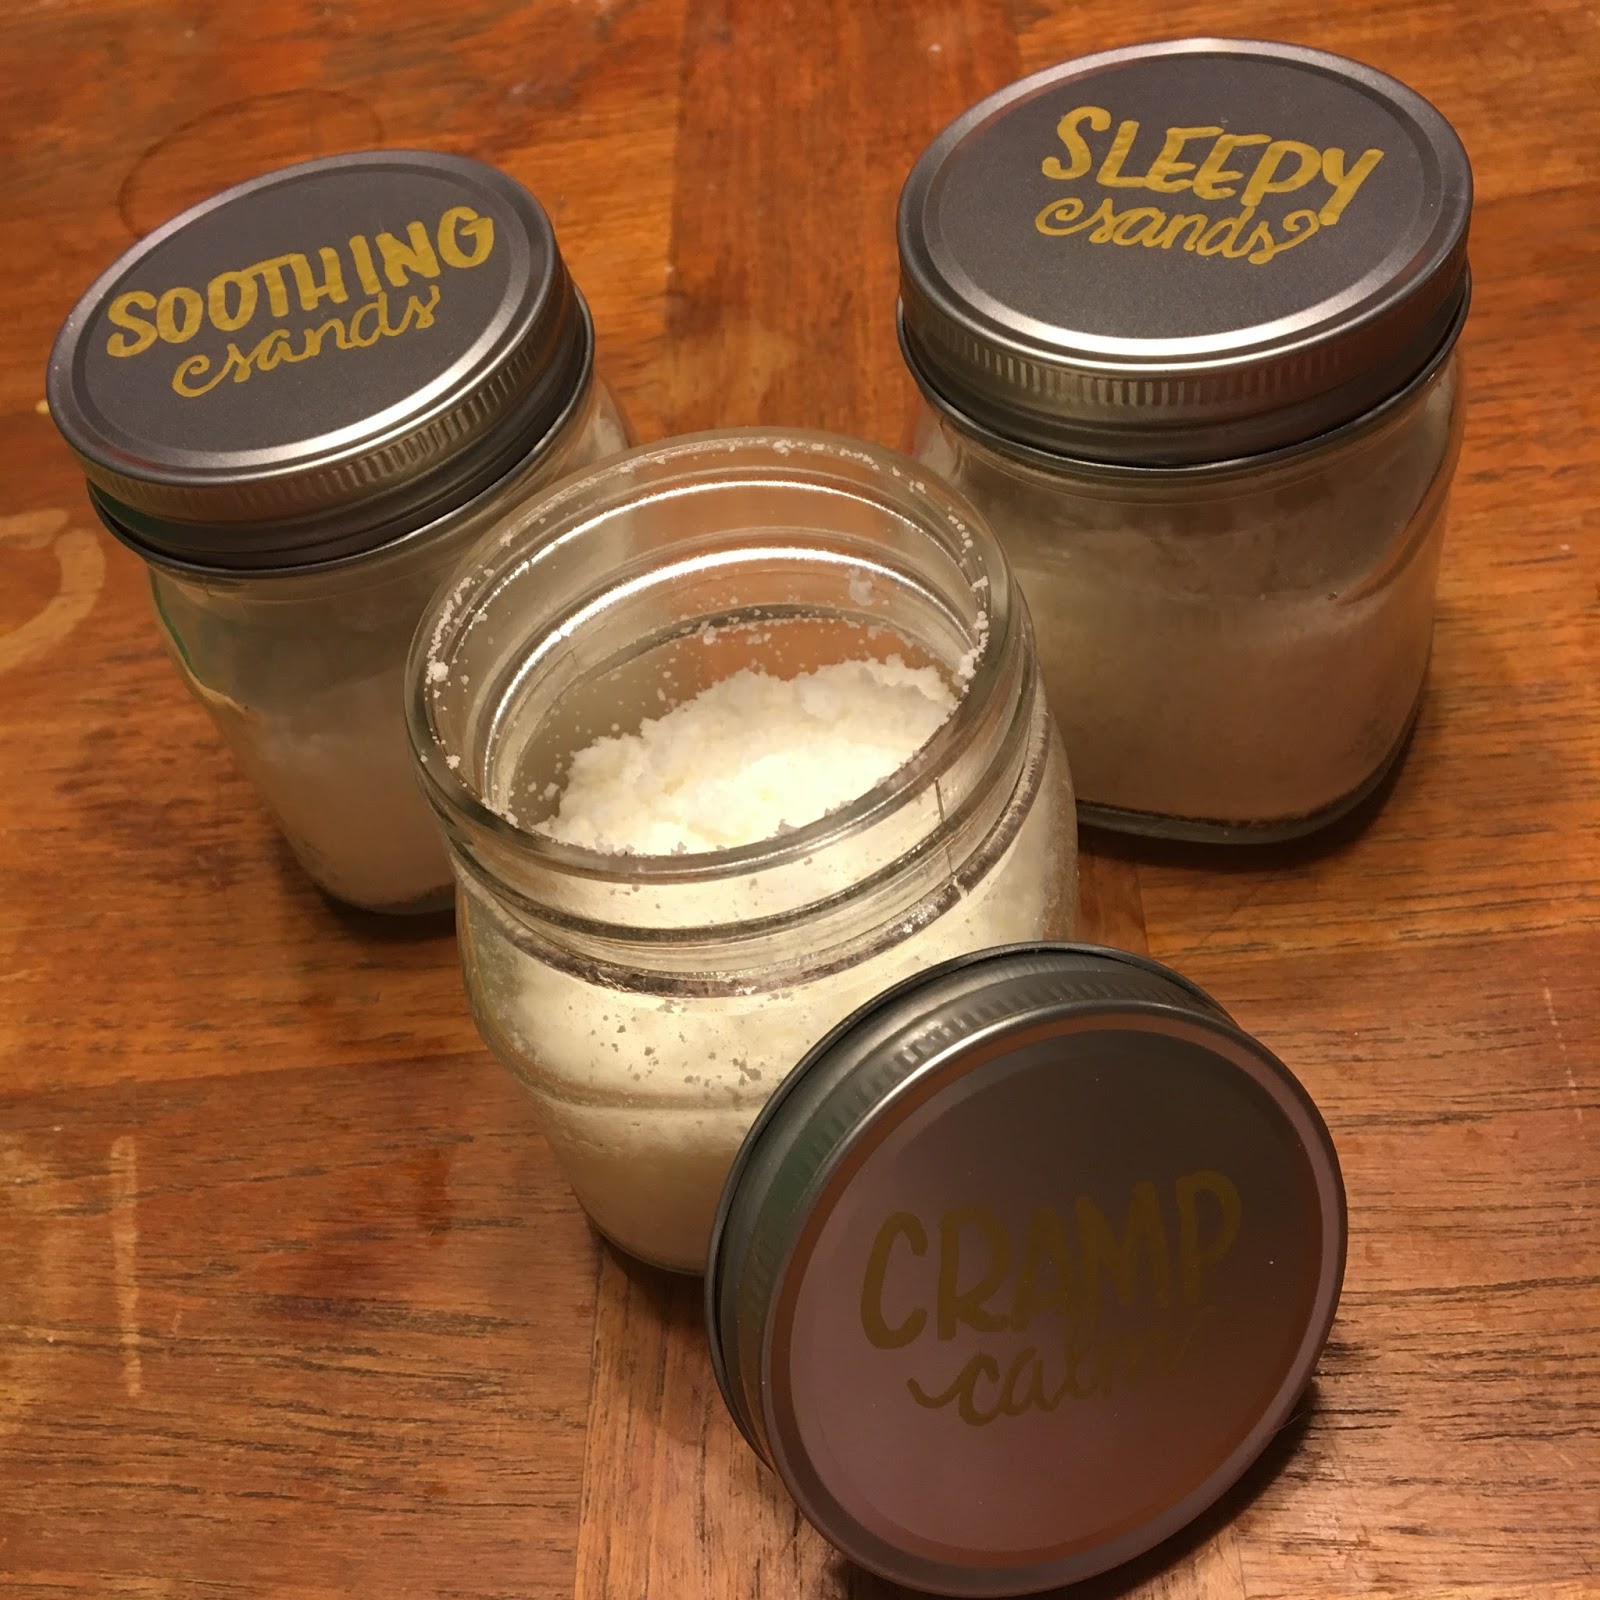
Basic Recipe: Baking Soda, Citric Acid, Arrowroot Powder, Epsom Salts, Coconut Oil, Witch Haze, and Essential Oil Blends


My Choices:
  • “Cramp Calm” Cramping/Pain Relief Blend: Lavender + Bergamot + Frankincense
    • For those early days when everything still hurts like crazy
  • “Soothing Sands” Healing Blend: Frankincense + Lavender + Helichrysum
    • To help tone, soothe, and heal 
  • “Sleepy Sands” Calming Blend: Lavender + Chamomile + Vanilla
    • To help calm nerves and anxiety and encourage restful sleep (also, it’s toddler friendly!)

Bonus Item: Peri Prep Balm

Basic Recipe: Evening Primrose Oil, Shea Butter, Beeswax, and Essential Oils (Geranium + Frankincense)


This is a pre-labor item I plan to start using next week (around week 36). It's designed to to help prepare the body for labor by building skin elasticity and can prompt dilation.

Now, I feel compelled to add: I am NOT an aromatherapist and cannot vouch for any of the above as legitimate. I do have a good friend who is a certified RA, and I consult with her regularly as I mix and use oils. I recommend finding a source of information you trust and reading up on oils and their uses before jumping in. I’ve done TONS of research over the past year and I had no clue how much I didn’t know! Only certain oils are safe for different ages/conditions/uses, and it’s important to use them with caution. I share this in case others find it interesting, but with that disclaimer: do your own research!

I’ll report back with how all of this goes – could be a rousing success, could be that I don’t even touch them at the hospital. We’ll see!

Getting SO excited to meet this baby girl! Can’t wait to tell y’all all about it!

Wednesday, January 18, 2017

What's In My (Diaper) Bag?


Once upon a time I wrote a post about all of my diaper bag favorites. I never got around to editing and publishing it, however, and now many of my favorites have changed.

See, that original post was written when The Bird was, oh, about 4 months old. Now she’s a walking, talking, exploring, busy ball of energy and my favorites have had to change to keep up a bit.

We recently received a new diaper bag (thanks to the CheekyTummy Brand Ambassador program), and I LOVE it. It has fantastic pockets, is super easy to pack, has versatile carry options, and is adorable.

As I was packing the bag up to try it out, I remembered that long forgotten post and decided to update it! I thought y’all might enjoy seeing some of our “must haves” and favorites, and I’d love to hear what you can’t live without, too!

So, without further ado, here it is...


What’s In My Bag:


Let’s start with the bag itself. We have THIS ONE from Cheeky Tummy. 


As you can see, the pockets are fantastic (y'all...pocket people are my people). There are:
  • two large outside pockets
  • three large inside pockets
  • one insulated pocket
  • one mesh pocket
  • one small paci pouch, and
  • one large zipper pocket
Not only do they make organizing the bag a snap, they’re very well thought out – the insulated pouch is great for her cup, we keep emergency snacks in the mesh pouch (easy to grab), the paci pouch can be easily wiped down/disinfected when needed, the changing pad fits perfectly in the zip pouch, and the outside pouches work great for storing the extra bag straps and my stuff (phone, wallet, keys). 

Have I mentioned I like pockets…because I might have a problem…

Now, on to what we keep inside the bag!

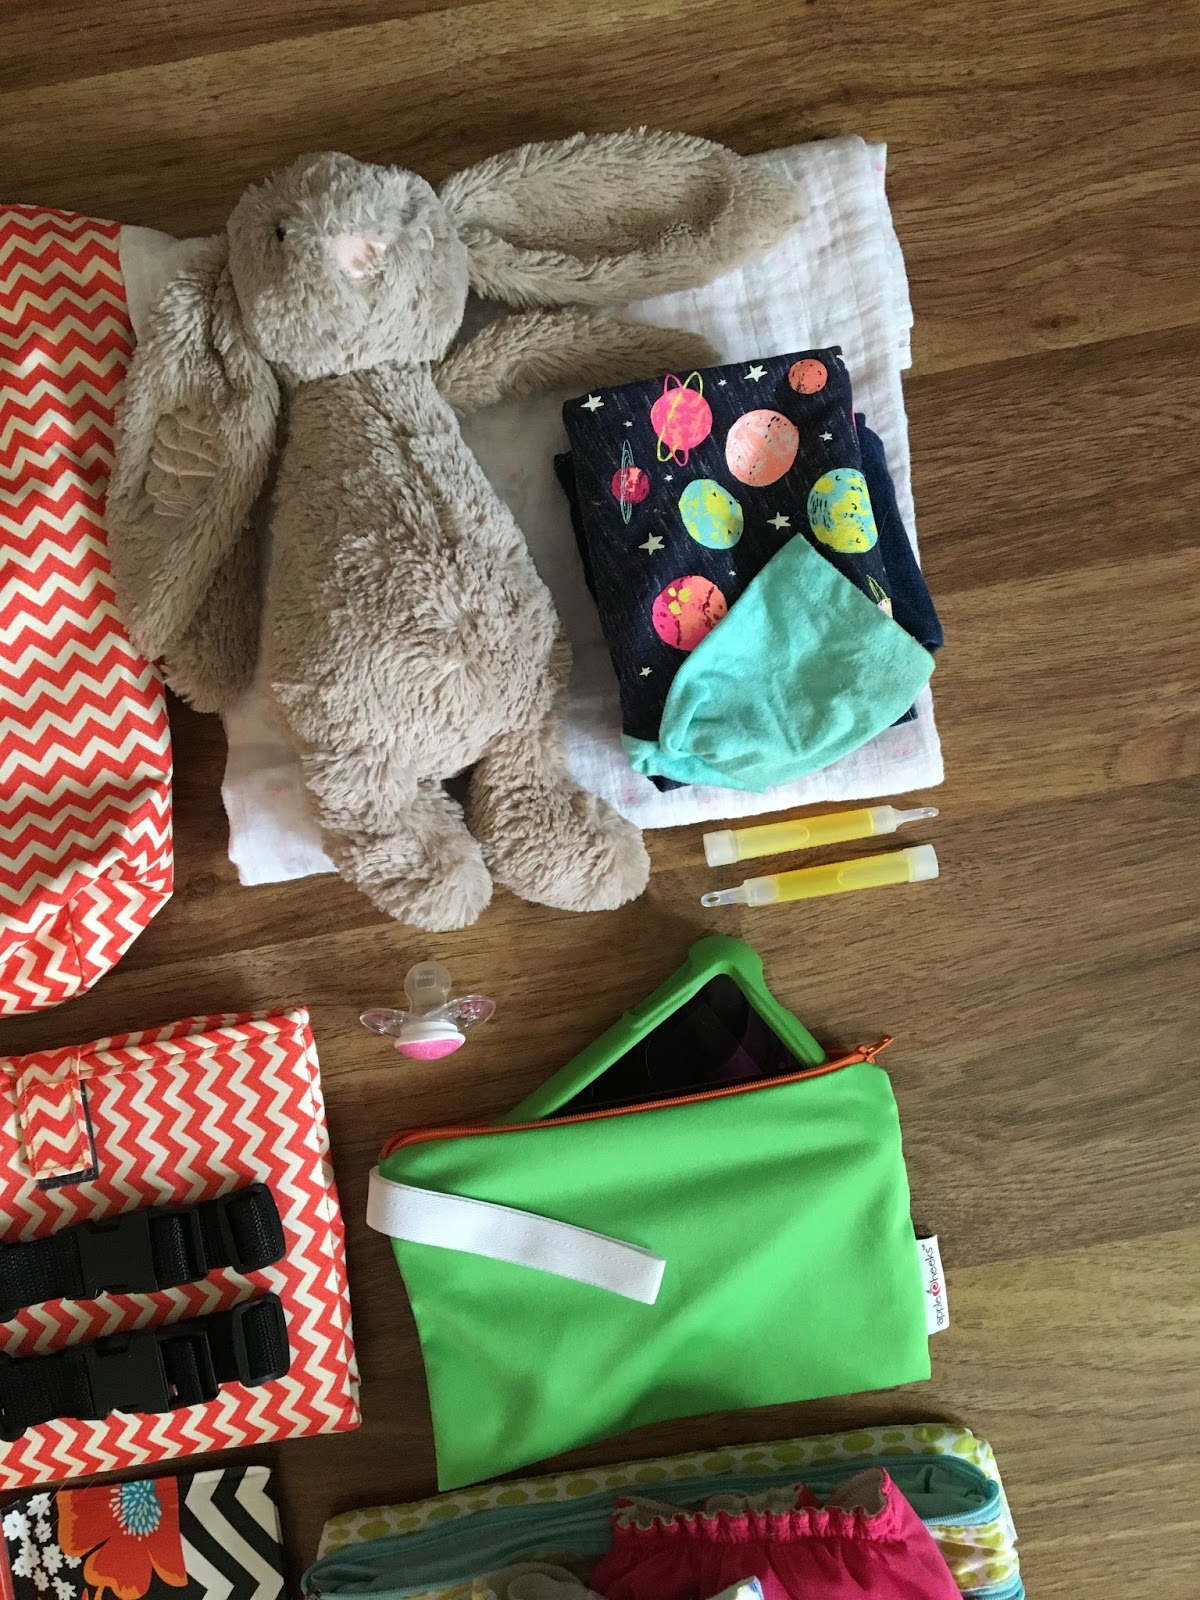
Next, on the left, we have what I like to call our “Hanger Prevention" Stuff (toddler mamas, feel me?):


  • ezpz Mini Mat: with a toddler who still prefers eating with her fingers directly off the table, this is a lifesaver at restaurants. Suctions to the table and rinses off easily!
  • CheekyTummy Multipurpose Cover: this cover has so many uses: nursing scarf, carseat cover, shopping cart cover, and (my favorite) high chair cover. See messy toddler above – we love having a way to keep the mess somewhat confined.
  • Ella’s Kitchen pouches & snacks: I have a love affair with Ella’s. We avoid any added sugar with The Bird’s snacks, and Ella’s does a great job of offering a wide, yummy line that satisfies a busy toddler without sugar! Our favorites are the Nibbly Fingers and Ginger Cookies.
  • Munchkin snack cup: because apparently you can’t ride in a car seat without a supply of puffs or dry cereal
  • NumNum spoon: we did BLW (baby led weaning) with The Bird and accidentally created a stubbornly independent eater. These little spoons make it easier for her to feed herself, even pureed things! (Note: ours are hard to find, but these are similar)
  • Munchkin Miracle 360 cup: The Bird is oddly particular about her cups, and this is the only one she likes. We have several variations and I love how easy they are to clean (no straws or spouts or valves for yucky stuff to get stuck). Plus, it’s easy for her to navigate (she can drink from any point on the rim, just like a regular cup), it doesn’t spill or leak (!!!), and it’s better for her little developing mouth. 
  • Boon SNUG: I keep one of these stashed in the bag for those “We left the cup in the car” moments. It fits on practically any cup and turns it into a spill-proof sippy.
  • OXO Tot roll up bib (and spoon): I like that this bib is silicone and fabric, making it easy to rinse post-meal, it has a pocket for catching the things she drops, and it rolls into itself for easy storage. We keep a spoon tucked inside it, just in case.

Then, we have our “Toddlers Are Walking Messes" Stuff:


  • Changing pad: we love the one that came with the bag – yay!
  • Planet Wise wet bag: we use this brand because it’s a PUL/fabric combo bag, meaning the mess/wet stays inside and the outside stays dry and clean (no leaking or dampness). Plus, they’re super durable and easy to wash.
  • Cloth Diapers: I have SO MANY THOUGHTS on cloth diapering that I won’t share here, but you can check out my primer posts (here, here, here, here, and here) if you’re interested. We carry around 2-3 when we’re out, just in case. By the way, the floral design is a LilyBee – made my a friend of mine – and it’s wonderful. If you’re interested, let me know and I can get you connected!
  • Huggies Natural Care wipes: we use cloth wipes at home, but while out, these are simpler. I’ve tried several brands and just keep coming back to Huggies. They’re thicker, more durable, unscented, and just work better.
  • Kleenex To Go: these are mostly for me, for The Bird we use...
  • Boogie Wipes: lifesavers, these are. Y’all, really, WHERE DOES ALL THE SNOT COME FROM? Her head is only so big. I do not understand. We buy in bulk.
  • GermX: because aforementioned toddler and snot

And finally, sticking with the theme above, our “Inevitable Breakdown Solution" Stuff (because #whineyearold):


  • Swaddle Designs blanket: I know everyone is familiar with Aden+Anais, but this brand is hands down my favorite swaddle. They’re big and cushy and way softer than any AA I have. Plus, the prints are lovely.
  • Bunny: this is The Bird’s baby. It’s a JellyCat bunny personalized via Peek-A-Whoo.
  • Change of clothes: the diva dislikes being wet, but has zero qualms about getting wet…so…
  • Amazon Fire: we have a Curious George addiction, y’all. It’s bad. She’s in love. I don’t like her having the tablet on too often, but on occasion, it’s the only thing that works and you do what you gotta do.
  • MAM paci: yes, we still have a paci. I like sleeping. I’m balancing it out with the rimless cup, right? Right.
  • Glow sticks: my MIL figured this trick out – The Bird thinks these are THE BEST THING EVER! In an emergency, we pull one out, crack it, and insta-calm. They’re like baby crack. Walmart sells them in big bags, just sayin'.

I think that covers it all. We’re in the throes of #ToddlerLife, so needs change daily depending on The Bird’s mood and preferences, but these are our regularly rotated staples.


Now, if you’ll excuse me, someone is currently emptying out the prettily packed bag all over the living room floor. Thanks for reading and let me know what all you have to have in YOUR bag!

Sunday, January 8, 2017

January Meal Plan Recipes


Explanation for this post in the form of a life update:
  • The Bird is now 16 months and NEVER SITS STILL. She’s exploding with words, energy, and mischief. She’s constantly hungry and/or eating, but is still wearing 12M clothes. She’s in love with Curious George and learning faster than I can teach her.
  • The Boy is in the dissertation writing stage of his PhD, so any time he has that he’s not chasing a toddler, he’s writing or reading or researching. He’ll also be teaching this semester and is working on OU’s retention committee part time.
  • I’m tutoring two days a week, serving as the nursery coordinator for our church (managing 100+ volunteers), babysitting two days a week, doing Montessori early learning with The Bird, and running A Double Batch (my cookie business) out of the house.

So, you might say we’re kinda busy.

And, since the cooking and cleaning fairies have yet to find our house, meals around here require a bit of planning so they don’t all end up being Goldfish crackers, a spoonful of peanut butter, and thrice reheated coffee at 9 pm.

Meal Planning has become my best friend. I plan out our meals for the month, make a GIGANTIC shopping list, and spend one weekend shopping, chopping, slicing, measuring, packing, and prepping. It’s a long process (and a decent cash outlay up front), but I end up with 30 lunches and dinners out of it, so it’s worth it. Plus, it’s less thinking on a daily basis, fewer trips to the store each week, and I can monitor exactly what goes into our food.

We cook in our slow cooker A LOT (we have this one, and it’s amazing), but we also have some favorite stovetop or oven recipes. Breakfast is simple staples (oatmeal, avocados, eggs, toast) and lunch is frequently leftovers from the night before. For dinner, I keep the sides simple (salads, frozen broccoli, green beans, brown rice). We've learned over time what we love, what works, and what kind of recipes to trust. 

I posted the following photo a few nights ago and had quite a few folks express interest in what recipes I use, so I figured I'd share! 


This is how it looks at the beginning. Once I’ve shopped and collected ingredients, I outline all of my recipes in a spreadsheet (I’ll link my file for this month below). I then spend a chunk of time chopping, slicing, dicing, peeling, etc. so that all I have to do is dump ingredients into freezer bags or combine in pans.

I usually start with my crock pot bags. I line up my ziplocks, add the protein to each one, add seasonings next, then veggies, and wrap up with liquid. A lot of the recipes use similar ingredients, so use the excel sheet so that I only have to grab each ingredient once (i.e. I add salt to each bag at the same time, then pepper, then ginger, etc). I’ve found working down the list like that to save me time. I then put together the meals that require a bit more prep.

We store our meals in our chest freezer, and I get the next day’s meal out the night before to thaw in the refrigerator.

I’ve adapted many of these recipes to feed a family of 2-3, but you can easily double them. Most of these we’ve tried before and love, but a few are new. I’m planning to review each one and do a follow-up post at the end of the month!


So, without further ado, here are my recipes! Hope they’re helpful to some of you! I’d love to answer any questions or offer tips, just let me know! 


Friday, July 15, 2016

Cloth Diaper Primer, Part Five: Dirty Details


Now that I've overwhelemed you with information, I'll wrap up the series (for now) with the details on our process - changing, laundry, and travel. Note that this is what works for us, so remember you can modify anything to fit your family's needs! Cloth can work for everyone, and there isn't just one correct way to do it! Let's start with how it works in our house day to day.

Our Changing Process (using an AI2 System)

Wet Diapers
If the diaper is just wet, we unsnap the diaper, remove the insert, place the insert directly into the diaper pail/wet bag, wipe (we use cloth wipes & a spray bottle), replace the insert with a fresh, dry one, and resnap the diaper. Covers can be reused a few times before they need to be changed!

Dirty Diapers
If you have poop to deal with, the process changes a bit. The first part is super simple: we unsnap the diaper and remove the whole thing from her bum. Then we wipe and put on a new cover and insert. The next steps are the involved part.
  • If your little is EBF (or even EFF), you can toss the entire dipe, mess and all, into the diaper pail/wet bag. EBF poo is water soluble, so you don't have to rinse/remove before washing. 
  • If your little is on solids, like The Bird, you'll want to remove the poo before putting the dipe in the pail. We use microfleece liners, so the mess typically falls off into the toilet. For messier messes, we use a diaper sprayer (and SprayPal) to remove as much as we can. Then, we toss the rinsed insert and cover into the pail. 

On the Go
Cloth while out is really no different than cloth at home! When we leave the house, we make sure to take several clean inserts, several clean liners, and an extra cover or two. We also take a small, zippered wetbag and disposable wipes (but you can use cloth wipes while out, too). When we go to change, we do the same thing as we would at home - unsnap, wipe, add clean dipe. If it's wet, the insert goes into the wetbag and is replaced with a dry one. If it's dirty, the entire dipe goes into the wetbag (I shake it off when possible), and a new dipe goes on the bum. When we get home, I dump the wetbag and contents into our pail to be washed with everything else.

See? It's not that much more involved than using disposables. It sounds like several steps, but once you get your process down, it's super easy! Now, let's talk laundry.

Our Laundry Process

We wash pretty much every other day. I start in the mornings after The Bird's first change. I grab the wet bag (replacing it with our second bag) and toss the contents and the bag into the washing machine. Then, our wash routine for an average sized load is as follows:
  • Quick wash on COLD with 1 line Tide Original (powder or liquid)
  • Heavy wash on HOT with 3 lines Tide Original, a scoop of washing soda*, and a scoop of Oxiclean
  • Tumble dry liners and inserts 
  • Line dry covers
NOTE: When washing, you want your fabric-water ratio to be like a stew. The diapers should not float freely around (like items in soup), but should not be so crammed that they can't move. You want them to agitate against each other to aid in cleaning. 
(*we use washing soda because we have VERY hard water. It's not a requirement for everyone)

Then, I prefold our inserts (so that they're easy to grab during changes), and place all the covers, inserts, and liners in baskets under the changing table. Done.


Tips & Troubleshooting

  • I'm getting leaks - what can I do? That will depend on WHERE you're getting leaks and what system/materials you're using. 
    • Microfiber inserts are prone to what we call "compression" leaks (i.e. squish leaks). If you're noticing an all over type leak that seems to happen at night or during naps (or when your little wears a snug onesie), you may need to add additional absorbency or change more often to fix it. 
    • Fleece lined covers are prone to "wicking" leaks (leaks that occur around the legs). This can be solved by ensuring that none of the leg material is tucked inside the diaper. 
    • Leaks around the legs are typically a result of poor fit. Either the diaper rise needs to be adjusted, or the diaper is not tight enough. Go in a few snaps to see if it helps. You want a snug fit, not too loose, not too tight. 
      • How tight is too tight, you ask? Check your little's legs for marks when you take their diaper off. If you see pink marks that begin to disappear within a few minutes of removing the diaper, it's fine. These are called "sock marks" (just like the marks tube socks leave on your ankles) and are an indicator of good fit! If, however, you see bright red, raised marks that stick around, you've gone too tight. These are called "angry marks," and they can lead to rashes and abrasions. Avoid those and go out a snap setting. 
  • What if my diapers are starting to smell? Your washing routine is likely to blame - either too much or too little detergent. When in doubt, decrease what you're using. You want just enough to get the load clean, but no more. It may take some trial and error to figure out your perfect balance. In addition, you want to be using the correct amount of water (see "stew" v. "soup" comment above)
  • What do I do about stains? The sun is your best friend when it comes to stains. A few hours in the sun can usually get out even the trickiest stain. If not, Buncha Farmers is a great CD-safe stain remover, and, in desperate times, a drop or two of blue Dawn and a toothbrush may be the answer. However, I've found that additional washes and additional sun usually does the trick, even on stubborn spots. If you're fighting dinginess, consider adding something like Oxi to your wash or checking to see if you have hard water. If so, adding a softener will help brighten everything up!
  • My diaper pail smells, what can I do? There are a few options. One is to consider an open pail. They honestly do not smell like you'd think they would. The air circulation helps to keep that from happening. If that's not an option (like at our house...where we have pets and a mobile baby), you may want to sprinkle a bit of baking soda into the bottom of your pail or wet bag. It will help to control the odor a bit.
  • How about traveling? Can you cloth while you travel? Sure! We do it all the time. We also occasionally go the disposable route, but both options work. More on that below.

Traveling with Cloth

It's totally doable! With the right supplies and a little dedication, you can cloth anywhere. When we travel, our supplies and plan differs depending on where we'll be.
  • If we're going to be staying with family and have access to a washing machine, we pack our diapers, wipes, and wetbags and use the exact process and set up that we have at home.
  • If we're going to be staying at a hotel, we pack a few extra supplies. Since I know washing machine access will be hard to come by, we take disposable liners and wipes (to make mess disposal a little easier), and I take zippered wetbags for storage. If we're going to be gone for less than 3 days, I just make sure I have enough to go without washing. If we're gone longer than that, I take detergent and either find a machine or wash in the tub. Clearly, it's trickier when staying in a hotel, so we frequently go the sposie route for those trips. It can be done, however, if you really want to!
That's it for our process! If I've missed anything that you want to know, let me know in the comments. Also, if you're having issues, I'm more than happy to help! Shoot me a note and I'll do my best to help you solve the problem. I love to spread the fluff love and help others embrace it!

Thanks for reading, and I hope you've found some helpful information!

Thursday, July 14, 2016

Cloth Diaper Primer, Part Four: Building A Stash


Hi, friends! So, now that we've discussed the different types of diapers available, let's talk about how to build a stash: what you need, how much you need, key accessories, etc. I'll be listing some of my favorite brands, but please note that brands that work for us (and our teeny girl) may not work for everyone! Take a look at your options and pick one that feels right for your needs!

Let's start with a quick look at what my stash includes:

I know that seems like a lot of stuff, but don't let it overwhelm you! We've bought over time and added as needed - you don't have to grab it all at once. Get the essentials and add the rest as you go. Now, let's talk details.


Diapers

What you need and how many you need will depend on how often you want to wash. For example, if you're okay with washing a load every day, you can get away with a smaller stash. If that's too much laundry for you or your lifestyle, you up the number to last you the number of days between washing. We wash every other day (typically), so I made sure my stash lasted me 2-3 days.

If you're starting from newborn days, you'll want to guesstimate about 12 diapers each day (so 12 dipes if you wash every day, 24 if you wash every other, you get the idea). Older babies typically go through 8 diapers each day, so a stash of 24 will last you 2-3 days easily.

Another thing to consider when determining how many you need is the system you choose. AIOs and pockets must be washed after each wear, so you'll need a bigger stash. With AI2s or prefold/fitted systems, you typically get more than one wear out of each cover, but inserts still need to be washed after each wear. That said, here's what each system's stash might look like (for an every other day wash routine):
  • Prefolds: 24 flats or prefolds, 10 covers
  • Fitteds: 24 diapers, 10 covers
  • Pockets: 24 diapers, 24-30 inserts
  • AIO: 24 diapers
  • AI2: 24 inserts, 10 covers

What I Do 
We've switched between different systems as we've learned what works for The Bird. We started out with Rumparooz Lil Joeys diapers (an AIO newborn system). I wanted to start off with something SUPER user friendly, at least until we got our feet under us with this whole parenting thing. I assumed we'd use them for a few weeks, but we ended up using them for a few months (because Miss Thing is TINY). That said, my investment was worth it, but it wouldn't be for everyone. We then moved to the Flip AI2 Hybrid system. We loved our Flips, but we were getting leaks often. Turned out, they just weren't snug enough on Wren's teeny legs. We're now using AppleCheeks and I'm IN LOVE with the brand. They're actually pocket diapers, but we use them as AI2 in order to get more use out of each cover. (We've also noticed fewer leaks when using them as AI2, and I don't have to stuff them!) The AC are pricier than Flip, so we've bought mostly used and slowly built a stash. We still go back and forth some, but AC are our primary brand now. 


Inserts, Boosters, & Liners

We talked inserts a bit, but I want to address the different options you have and what that might mean for how many you need. You can go with natural fibers (bamboo, hemp, etc) or synthetic (microfiber), and you can choose between sized or one size. The key differences are in absorbency level and wicking properties. Natural fibers will be more absorbent (and less prone to leaks), but won't feel as dry. Microfiber wicks moisture away much faster, but doesn't hold as much and is prone to compression leaks (think about squishing a sponge and you get the idea).

Money Saving Tip: You can use flour sack towels as flats, too! I haven't done it personally, but I have several friends who've had success with them. Here's a link if you're interested. 

You'll be changing about as often no matter which fiber type you choose, so just go with your preference there. As far as sized v. one size,  if you go with sized inserts, you'll need a stash in each size, so keep that in mind.

Now, let's talk boosters & liners. These are optional stash additions, but can be SUPER useful. Boosters allow you to easily up absorbency (for naps, night time, or outings) without doubling up bulk. We love boosters for night time! Liners are thin layers of fabric (typically microfleece) that lay on top of your inserts. They help with wicking (as they stay very dry against baby's skin), keep your inserts from staining, and make poo disposal a breeze (nothing, uh, sticks to them...if you catch my drift). They're also useful if you find yourself needing to use diaper cream to treat a difficult rash. Most commercial diaper creams will stain and can clog fibers, causing your inserts to repel, liners keep the cream off your dipes!

As far as numbers, it varies for boosters and liners. You don't HAVE to have either, so it's really personal preference. We have about 10 boosters and a ton of liners (but that's because I made my own). Start with a few and add on if you like them.

One other optional addition are disposable liners. These make clean up on the go crazy easy. They're thin layers of (typically flushable) material that lay on top of your dipes to catch any messes that may happen. When you change the diaper, simply toss the liner and contents, replace your insert, and you're good to go. No worries about carrying around a mess in your wet bag. They also make caregivers' lives easier, as you can imagine. We don't use them very often, but I keep a few in our diaper bag for moments when they're nice to have.

What I Do
We use a combination of Flip microfiber and AppleCheeks bamboo inserts. We started out with only microfiber, and while it works great during the day, we were starting to get leaks at night. I bought a few bamboo inserts and the leaks stopped! We love the bamboo so much that I've started buying additional inserts for daytime use, too (they're great for outings because they last us a little longer). We also have a stash of Flip newborn microfiber inserts that I use as boosters, and they work perfectly. I just fold a bamboo flat around the microfiber, and we get the best of both worlds. For liners, I bought a few yards of microfleece from a craft store and cut it to fit our diapers. They wash great, work amazingly, and cost maybe $5 for like 30. Plus, they're pink and have birds on them. Win win. As I mentioned, we don't go the disposable route often (I think the microfleece works just as well if not better), but we do have a few on hand, just in case. 


Cloth Wipes, Bum Spray, & Balm

When I first started looking into cloth, I thought the idea of cloth wipes was weirdly extreme (disposable wipes just seemed waaaaay easier and less messy). I came around pretty quickly when I realized how easy it was to just fold the wipe into the dirty diaper and toss the whole thing into the wet bag (rather than needing an extra trash can for wipes). Not to mention the money we're saving by not buying (as many) disposable wipes. (We still use them, because parenting. We just don't use them for diapers). There are tons of options for wipes and they're super affordable. You can get premade ones from pretty much all of the major brands, there are a bunch of ladies that sell them on Etsy, and I've even known folks to make their own buy cutting up flannel receiving blankets or using baby washcloths. You'll need at least 24 (we have 48 and never run out), so just opt for the ones that work for your budget.

Now, when you use cloth wipes, you need a way to dampen them, right? Right. However, people are split on their methods for this. The teams seem to be: Team "Wet As Needed" and Team "Store Damp." Team WAN uses a spray bottle of wipe solution to spritz a wipe or two at each change, keeping the rest dry until needed. Team SD wets their entire stash and stores them in a wipe dispenser. There's no single "best" way to do it, but I will say I'm biased toward Team WAN because I have an issue with (aka fear of) mildew. That said, you do you, mama. If it works, awesome!

As far as wipe solutions go, there are probably as many recipes/suggestions/products for that as there are options for wipes. Again, you can buy pre-made or make your own pretty easily. Recipes range from "put water in a spray bottle" to complicated concoctions involving essential oils, distilled water, and Castille soap. We opted to get a pre-made solution tabs that you dissolve in water as needed, and I love it (link below). Just like with the above, just pick a method that works for you.

In addition to wipes and bum spray, you may have an occasional need for booty balm. While rashes are rare, they do happen (teething, learning to crawl, illness, new meds, etc.) When they pop up, you have a few options. You can either use a commercial diaper cream (Desitin, Butt Paste, Balmex, etc) with a liner (otherwise you'll get stains & repelling), or you can use a cloth-safe cream. Most all-natural diaper creams are cloth safe, but if in doubt, Google it. There are many many websites out there than can tell you if your cream will stain/cause issues. Another option (and one we love) is to use coconut oil. It's natural, easy to find, affordable, and works great for the occasional daily irritation. For the big bad rashes (like the ones her antibiotic gave her), we pull out the big guns and liners. My advice is just to check your cream past a reputable site to be sure it's safe.

What I Do
We bought our cloth wipes from an Etsy shop ($25 for 48 wipes!), and we've never run out. They've lasted us a solid 9 months and are still kickin', too. They're flannel, serged on the edges to prevent fraying, and are all white (i.e. bleachable if needed). We love them. To dampen, I keep a small spray bottle (one I found at Target in the travel section) next to her changing table. We periodically fill it with warm water, drop one of these Baby Bits tablets into it, and shake to dissolve. Her skin stays baby soft and the lavender helps to soothe any potential irritation. If we do have irritation issues, we use either California Baby (the calendula version) or coconut oil. I've also used Honest's Healing Balm with success. If the rash gets bad, I add Balmex into the rotation, making sure I have plenty of liners on hand. 

Diaper Pail, Pail Liner, Wet Bags, Diaper Sprayer, & Spray Pal

Last, but not least, storage and clean up! This is the part I know you've all been waiting anxiously for, right? Thought so. Not to disappoint, but I'm not going to go into the dirty details of our clean up process just yet. Today I'm focusing on supplies, but that part is coming. For now, let's talk about what you need.

You need somewhere to put the dirty diapers until time to wash. For us, that meant a diaper pail, but it could also be as simple as a large wet bag. If you choose a "pail," you don't have to get a traditional diaper pail, a trash can works great. I'll link the one we have below, but I've also used a $10 kitchen trash bin from Walmart with zero issues and I know some folks swear by their fancy stainless pails. Whatever you choose, though, you're going to want a liner, preferably one made from PUL or a similar fabric so that it's waterproof and washes easily with your dipes. That way, come wash day, you take the liner out of the pail, dump it and the contents into the washer, add your soap, and go. Washable liners make the process much simpler.

Note: there's some debate over whether you should have a pail with a lid, or an open pail. We have a lid (because we have pets and a mobile baby), and we haven't had any issues so far. The concern is that diapers left in a closed pail (with no air circulation) may result in a mold/mildew problem, and many hold that open pails don't smell as strongly as closed pails. Again, we've had no issues, but an open pail may be something you want to consider if you don't plan on washing every other day.

You can also opt for a large wet bag (if you don't want to go the pail route). Wet bags are convenient in that they are easy to store anywhere and make travel a snap. We have a large wet bag for travel (when we know we won't have our pail), and it's just as easy to deal with. So, if you're space constrained, a wet bag might be the way to go.

Speaking of wet bags, you're going to want several smaller ones, too. They're key for outings while in cloth (storing dirties), but they're also nice for soiled clothes, wet bathing suits, and other things you want to keep separate from the contents of your diaper bag. We have several in rotation so that we know one will always be clean and ready to go. We used to keep a tiny wet bag with pre-moistened wipes on hand as well, but it became a hassle, so now we use disposable wipes when out. Your call on that.

The final thing you may want for clean up at home is considered optional by some, but not at this house. It's a diaper sprayer and it's essential. This magic little thing connects to your toilet and allows you to easily spray off messes before tossing diapers into the pail. {Warning, I'm going to talk poo for a second, so if you're squeamish, skip the rest of this paragraph.} If your baby is EBF (exclusively breastfed), you do not need to worry about poo. EBF poo is completly water soluble, so you can just toss the entire mess into the pail. If not, you'll need to remove any solid waste before washing. That can be done with the ol' "dunk and swish" method, but I'm not cool with that. That's where the sprayer comes in handy. When your little is a bit older and eating more, most of the mess will fall off the diaper (especially if you're using a liner). For those times when it doesn't, the sprayer is our best friend. It's quick, easy, and fairly mess free, especially when paired with the Spray Pal (more below). You can find sprayers from several brands, and they tend to be about $60 new. You can also supposedly make your own, but I'm not quite handy enough for that.

Finally, the Spray Pal is a fun little invention that helps keep messes contained when you're cleaning up. You simply attach a dirty dipe with the clip, spray off, and drop the dipe in the pail. I didn't think we needed one, but we got it on sale and now I reco it to everyone, sale price or not.

What I Do
We use a diaper pail from Safety 1st with a large Planet Wise liner. We have two liners so that one can go in the pail when the other is headed for the wash. We also have a smaller trash bin in the bathroom, with a smaller Planet Wise liner, that we use for diapers that have to be rinsed. It minimizes walking back and forth to the nursery. We also love Planet Wise wet bags and AppleCheeks size 1 sacs for travel & outings. We have about 4 that we use in rotation. They wash well and keep everything clean and stink free. Finally, we use this sprayer and the Spray Pal

I think that's pretty much it for my stash essentials! It has evolved since The Bird was born and will probably continue to evolve with future littles. The nice thing is that I can generally resell things that don't work for us in order to fund different things to try. Buying used is a great way to save money when you're experimenting, and there are tons of groups on Facebook dedicated to that exact purpose. In addition, many cloth diapering stores offer trial or rental programs to help you find a stash that works for you. Go in and talk to the owners - they'll be more than happy to help, I promise. Cloth mamas love talking about fluff!

Tomorrow I'll talk more about our process (for both changing and laundry), what we do when we travel, and do a bit of troubleshooting (stink, stains, and leaks). I'm also planning a post on moving beyond diapers with cloth (swim & potty training),  and perhaps one on brand experiences. In the meantime, if you have any other questions, just ask!

Thanks for reading!

Wednesday, July 13, 2016

Cloth Diaper Primer, Part Three: Know Your Options


Welcome to part three in my “Cloth Diaper Primer.” If you haven’t been following, we’ve discussed Myths (learning that cloth diapering is way easier than most people assume) and talked about the Benefits (saving money, doing better by the environment, and looking adorable while doing it). Today I’m going to address the different types of cloth diapers, features you may need to be aware of, and the pros and cons of it all.

I’d mentioned in a previous post that cloth diapers have come a long way since our grandmothers’ days! They now come in what seems like an endless array of shapes, sizes, types, and prices and it can be quite daunting to know where to start...

Before we started building our stash, I did a lot of research on our options – comparing features, prices, longevity of use, ease of use, etc. I also listed out some of what we were hoping to get from our stash, things like: usable for multiple kids, easy for caregivers (read: grandparents!) to use, flexible (we travel a lot and need options), and good resale value. When I compared that list to my research, it was easy to pick out the system that best fit our needs. I’d encourage you to do the same – consider what you want out of your diapers (and why you’re choosing cloth in the first place), and make sure that your wants match up with what your chosen system offers. Otherwise, your more likely to get frustrated and give up.

In the mean time, here are some of the things I found while doing research that helped me decide what system to go with. Hopefully this can help clarify all the options somewhat!

Basic Cloth Diapering Terms

  • One Size (OS): refers to diapers designed to grow with your child from newborn to toddler, usually sized in weights (e.g. 7-35lbs)
  • Sized: refers to diapers designed to give a more customized fit (e.g. S-M-L-XL); requires sizing up into a new stash as your child grows
  • Aplix: type of closure (using Velcro or hook & loop material); easier to get a perfect fit, but has a short lifespan and will need to be replaced periodically 
  • Snap: type of closure (using KAM style buttons); fit is somewhat limited, but lasts much longer than aplix
  • Snappi: modern answer to diaper pins; consists of T-shaped arms with grips on the ends that hook into fabric to hold it closed
  • Cover/Shell: waterproof outer layer of a diaper (typically made from PUL or wool)
  • Insert: absorbent inner layer of the diaper (can be hemp, bamboo, cotton, microfiber, etc.); comes in flats, prefolds, or sized inserts

Cloth Diapering Systems

Prefolds & Covers

This is the original, old school cloth diaper set up. Consists of a large, flat, rectangular piece of fabric that must be folded to fit around baby and closed with fasteners (either Snappi or pins). A cover is then added over the fabric to make the diaper waterproof. It’s a very economical option, but not the most convenient as it can be tricky to master (and intimidating for caregivers). While covers can be OS or sized, most inserts must be sized up as baby grows. Popular brands include: OsoCozy, Sustainablebabyish, & Hemp Babies.
  • Pros: Versatile, Easy to launder/care for, Inexpensive
  • Cons: Requires sizing up, Can be bulky, Requires several steps (insert + fasteners + cover)
  • Ease of Use: Low to Moderate
  • Price: Low (Most Affordable)

Fitteds & Covers

Similar to the Prefold/Cover system, but eliminates the need to fold to fit. These diapers consist of several layers of absorbent material, typically cut into an hourglass shape, with leg and back elastics added to improve fit. They come in OS options or sized, and you can get brands that fasten with snaps/aplix, or ones that require Snappi/pins, all depending on your preference. As with the Prefold system, Fitteds require a cover to make them waterproof. They are admittedly easier to put on, but come with the tradeoff of a higher price tag. Popular brands include: Sloomb/Sustainablebabyish, Thirsties, & Kissaluvs.
  • Pros: Highly absorbent, Easy to use
  • Cons: Requires a cover, More expensive, May require sizing up
  • Ease of Use: Moderate to High
  • Price: High

Pockets

The first iteration of what we now know as the modern cloth diaper. Pocket diapers consist of a waterproof shell with a lining that creates a stuffable pocket for your choice of insert (flat, prefold, or sized). They make diapering easier by eliminating the need to add a cover over a fastened insert. In addition, the pocket allows for versatility in absorbency level - just add additional inserts when needed. On the other hand, the pocket also means the diapers must be “unstuffed” before washing (a potentially messy job). Highly popular, pocket diapers are very easy to find new or used and come in a wide range of options (OS, sized, aplix, snap, etc.) Top brands include: bumGenius, Thirsties, Rumparooz, Alva, AppleCheeks, Blueberry, & FuzziBunz, as well as many others.
  • Pros: No cover required, Easy to adjust absorbency, Easy to use
  • Cons: Can be bulky, Can be difficult to get perfect fit, Must be unstuffed
  • Ease of Use: High
  • Price: Moderate to High

AIO (“All in One”)

As the name suggests, this diaper offers the ease of having every element included in one piece. A waterproof cover and several layers of absorbent material are sewn together to create the easiest to use cloth diapering option. These also come in a wide variety of options (OS, sized, aplix, snap, etc) and are easy to find. They’re great for quick changes (or cloth-wary caregivers), but can be trickier to launder (as they take longer to dry). Popular brands include: bumGenius, Thirsties, GroVia, Rumparooz, and many others.
  • Pros: Easiest system to use, Trim fitting, Universally user friendly
  • Cons: Longer drying times, Expensive, Requires a large stash
  • Ease of Use: Very High
  • Price: Very High (Most Expensive)

AI2 (“All in Two”) or Hybrid

The AI2 (or Hybrid) system is designed to combine the simplicity of pockets with benefits of prefolds, while adding an additional element of flexibility with the option of using disposable inserts. This system consists of a waterproof shell (similar to a Pocket diaper) that an insert is laid or snapped into (inserts can be flats, prefolds, or sized). This allows for versatility in absorbency level as well as the option of getting multiple changes out of one cover (if the cover isn’t soiled, it can be wiped down and paired with a fresh insert). That means smaller stashes and more wears between washing (i.e. longer life for your diapers). In addition, the AI2 system can also be used with disposable (frequently flushable) inserts, making on the go changes super simple. These typically come in OS or sized options, with the choice of aplix or snap closures. There is a bit of a learning curve to perfect fit, but after a few uses, the system is highly user friendly and is very affordable. Popular brands include: Flip, GroVia, & Best Bottoms.
  • Pros: Flexible, Multiple wears per cover, Easy to launder/care for
  • Cons: Can appear complicated/intimidating, Can take practice to perfect
  • Ease of Use: Moderate to High
  • Price: Low to Moderate

Bonus: Newborn Diapers

Not all babies fit in a one size diaper at birth, so some parents opt to build a small stash of newborn specific dipes to compliment their larger OS stash. Newborn diapers come in a variety of the styles mentioned above, just sized down to fit teenier babies. In addition, many newborn brands take umbilical cord care into consideration and include options to fold/snap down the front to accommodate healing.
  • Pros: Fits smaller babies better, Extra features for specific needs
  • Cons: Fits for a limited time, Can be expensive for amount of time used

For more information, this is one of my favorite comparison sites: Kelly’s Closet

So there you have it – the basic differences in your options! In my next post I’ll share a little more about why we chose the system we did (Spoiler: we went with AI2), and how we built our stash. I’ll also include some info on what your stash might need to look like, how our process works, our favorite accessories, and a few other tips.

Thanks for stopping by! 

Tuesday, July 12, 2016

Cloth Diaper Primer, Part Two: Why We Cloth


Here's part two in my "Cloth Diaper Primer" series. In my previous post, I debunked a few common cloth diapering myths. Now that we know it's not as bad as we thought, here are the main reasons we decided to go the cloth diaper route!

It saves money!

This was really what first got our attention about cloth. We’re a fairly frugal family, so cloth spoke to our sensibilities. Admittedly, the adorableness was a huge draw, but once we looked into the savings, it was basically a done deal.

If you read my previous post, you’ll remember that the savings compared to disposables are amazing. How amazing you ask? Cloth saves the average family over $2000 in diaper costs. TWO THOUSAND DOLLARS! I don’t know about you, but that’s a decent amount of money that I’d rather spend on things I’m not tossing in the garbage every day.

It’s better for baby!

I was a pretty laid back pregnant lady. I didn’t really read the books or freak out about much, but there was one thing that I went into panic mode over: the number of chemicals in our home. I looked around one day and they were EVERYWHERE – in the kitchen, in the laundry room, in the bathroom. Everywhere. I had a rash pregnant lady moment and announced to my husband that we were going CHEMICAL FREE! Bless him. He humored me (no doubt knowing I’d calm down eventually). I did, mostly. But the one thing I’ve stuck to is minimizing the number of chemicals that touch Wren.

That’s another nice thing about cloth – you avoid whatever “magic” (i.e. chemicals) lives in diapers to make them all absorbent & squishy. It’s way better for their new, sensitive skin. It also means less diaper rash! The only rashes we’ve had to deal with were antibiotic related. Otherwise, her bum stays baby soft and happy.

It’s better for the environment.

(not so) Fun Fact: It’s estimated that 10,000 tons of sposies go into landfills every day. Tons. Every day. Yikes.

Know what doesn’t go into landfills? Yup. Point made.

They’re CUTE!

Guys. This bum. I die.


But really – cloth diapers are ADORABLE. They’re fluffy and round and sweet and oh-so-huggable. Plus…they match outfits. And I’m Southern. If it matches, I’m sold.


They work better.

In addition to minimizing diaper rashes, cloth is less prone to leaks and blowouts. I mentioned in my previous post how many blowouts we’d had in cloth. Didn’t read yesterday? That’s okay. It’s zero. We’ve had ZERO blowouts in cloth.

Why? First, they fit much better than disposables (because they’re cloth, not paper, meaning they hug curves better). Second, they don’t stretch out when babies move around, so messes stay put (rather than escaping).

Matter of fact, I got so spoiled by how well our cloth worked, that I stopped remembering to pack an extra outfit when we left the house. Then, one Sunday, I put her in a disposable (due to using a new, unpredictable antibiotic). Thanks to Murphy’s Law, we had an accident while wearing said disposable. We ended up with a naked baby at church. Fun times.

Cloth babies tend to potty train earlier.

Now, I haven’t researched this, so I can’t say it with absolute certainty, but all of my cloth diaper friends will back me up: cloth babies potty train earlier. The reality of cloth is that babies won’t feel dry as long as they would in sposies. And, no one likes feeling wet. That said, cloth littles learn early to let you know they’re wet and need to be changed. Since they can easily recognize wetness, it makes it easier to teach them to use the potty.

So, we’re spending less on diapers AND using them for less time? Done.

We can sell them when we’re done with diapers!

I hinted at this in Part One, but many cloth brands hold their value fairly well, especially if you go with an All in Two or Flat + Cover system (more on those later). Some brands resell for 60% of the NEW purchase price! So, if you take good care of your stash and know where to sell when you’re finished with them, you can make back A LOT of what you put into it (making cloth EVEN cheaper in the long run).

And what can you resell a sposie for when you’ve used it? Zip. You just toss that money into the trash. No thanks.


There you have it! I’m sure there are other reasons to cloth, but these are our top. Ready to make the switch? Tune in tomorrow for more on the different types and how to choose what’s right for you! Still not convinced? WHY? Did you SEE that fluffy bum? Scroll back up and look again. Then tune back in tomorrow for how to start your own stash.

Monday, July 11, 2016

Cloth Diaper Primer, Part One: Myth Busters


This is the first post of several in my "Cloth Diaper Primer" series! We absolutely LOVE our cloth, and I apparently talk about it far too much given the number of friends who've asked about it recently. As a way to share the fluff love and to help educate others on the amazingness that is cloth diapering, I'm sharing my thoughts, process, and learnings over the next week. 

If you have ANY questions (literally any, I'm not shy), please ask! I'd love to help! 

Now, let's bust some myths!

Myth 1: “Isn’t that how our grandmothers did diapers? Seems like an old fashioned idea.”

Yes and no. Our grandmothers DID cloth diaper, but guess what! Cloth has changed. Meet the modern cloth diaper, mama.


And this is just one example! They come in so many shapes, sizes, and kinds that there’s bound to be something out there for everyone (yes, that does make it a little daunting to pick one, but more on that later). You can go with an all-in-one (which works just like a disposable), keep things basic with flats and covers, or pretty much anything in between. Plus, now that we know cloth is awesome, there are tons of mamas out there that have figured out how to perfect it (and we have TONS of tips)! It really is one of my favorite decisions we’ve made with Wren, no regrets.

Plus, how cute is a fluffy bum?


These aren’t your grandma’s diapers, Mama. Give ‘em a chance!

Myth 2: “It’s gross! I’ll have to touch poo and I don’t want stinky diapers sitting around the house.”

Newsflash – you’re a parent. You’re gonna be touching poo at some point. So let’s consider that a moot point, shall we? I will add, however, that I’ve had to get up close and personal with poo far less often than I would have if we’d gone the disposable route. Why you ask? Answer: fewer blowouts.

I know, I see you giving me a skeptical face over there, but guess how many my 9 month old has had? One. ONE, y’all. (Oh! Fun fact: she was in a disposable at the time! So that takes our total number of blowouts in cloth to ZERO.)

Also, I know you’re thinking: but won’t I have to like…get rid of the poo somehow? Seems easier to just toss a dipe in the trash. Well, yeah. But did you know you’re supposed to flush poo even if you use sposies? Yeah...surprise!


See? Told ya.

A few additional sub-points to clarify:
  • “Do you actually do the whole “Dunk & Swish” thing? Eww, no. Diaper sprayer, hun. We’ve come a long way since that practice was a thing. 
  • “Won’t my house stink if I have diapers sitting around?” No, not if you have the correct set up. Does the house stink with disposables? Same concept. Proper clean up and storage means no one has to know you cloth (but they will…cause you’ll tell them…cause it’s awesome.)
  • “So I won’t have to use wet pails?” Nope. Again, cloth diapering has changed. Fear not, friend. More on pre-wash storage later.
So, yeah, you’ll have to deal with clean up at some point, but remember me saying earlier that we have figured out how to perfect this process? There are ways to make clean up SO SO simple (I’ll touch on those in a subsequent post). Trust me – it’s not nearly as gross as you’re making it out to be in your head.

Myth 3: “Washing is a pain. Won’t I need a diaper service?”

Nope. Don’t get sucked in by the blogs that claim you have to have a super complicated washing routine. You really don’t need the fancy, infographic-inspired 12 step system you saw on Pinterest. Keeping it simple is actually better for your diapers (and budget) in the long run.

A few mini-myths to address here:
  • “You need a special (read: super expensive) cloth diaper-safe detergent.” Nope. I hate this one because I believed it for a while. Here’s the thing: Marketers are good at their jobs, y’all. Real good. But know what? Tide is also good at what it does. So is Gain. And All. And several other regular ol’ detergents. So, don’t listen to the folks trying to get you to shell out tons of money for “cloth safe” soap. Check your preferred detergent against a reputable, unbiased source (see FluffLoveUniversity), and go with what you like. (usually anything without softeners is good to go)
  • “You have to use tons of water.” Not necessarily. You don’t need 3 full cycles as some would have you believe. You don't need to add extra water to your machine. Again, keep it simple. You really only need a quick pre-wash and a full wash cycle for each load. No extra rinses or extra cycles required. Oh, and you don’t have to use hot water each time, either. Cold works fine for the pre-rinse. 
  • “Too much detergent will make your diapers stink or repel.” No. Nope. Nuh uh. Just use the detergent, y’all. Like you would for regular clothes. You need enough to get the ick off (why would you use less??) 
    • Note: Tide has quick dissolving bubbles, meaning suds don’t stick around and the diapers will rinse clean faster. But even if you use another brand, still use enough soap. Using too little will actually cause MORE problems.
  • “I can’t use softener on diapers.” True. But you really don’t need it. Most cloth materials are super soft anyway.

So, no. You don’t need a diaper service because if you can wash your clothes, you can wash cloth! It’s really super simple. Don’t let the crazy blogs scare you!

Myth 4: “It’s a lot of extra work and disposables work better.”

Not true. Sure, there may be an extra step or two when you’re putting the diapers on (and when you wash them), but compare that to running to the store when you run out or cleaning up when a disposable fails…and it's kinda worth the trade off.

Plus, cloth works A TON better than disposables. Remember me mentioning the number of blowouts we’ve had? Yeah. Add to that the fact that we don’t get diaper rashes, we rarely have to deal with leaks, and Wren can already tell me when she’s wet (I spy early potty training in our future!)

“But won’t I have to change my baby more often?” Yeah, maybe…but is that a bad thing? Dry bum equals happy baby, so I’m not sure why that’s a problem.

“What if we’re out somewhere?” Simple: change the diaper. Wet bags keep the wet/stink hidden away in your diaper bag! (more on travel/”cloth while out” later)

So, yes, it may be a bit more work, but it’s not that bad. It’s actually kinda fun. Plus, it’s hard to argue with the results.

Myth 5: “It’s too expensive.”

Not in the long run. It may feel daunting to set up a stash, but you can build one slowly (and affordably) and you’ll be reaping savings for years! There is a wide variety of brands and types depending on how much you want to put into it, and buying used (or seconds) is way cheaper than buying new. We’ve been able to build a great stash buy watching resale groups on Facebook or hunting deals.

Not to mention, when we’re done with our stash (likely in several years after we’ve used them on multiple littles), we can resell our diapers. Some brands resell for like 60% of what people would pay new. What can you resell a used disposable for? Mmhmm.

I have a friend who bought a stash of used newborn diapers for her son and resold them once he out grew them. When she did the math, she’d diapered him for 2 months for $7. SEVEN BUCKS, y’all! That’s not even a small pack of Pampers.

Still not convinced? Look! Numbers! Math!

Let’s start with disposables. Assuming you use Pampers:
  • Average cost per diaper = $0.28
  • 8 changes per day for 2.5 years = $2,045.12
To keep it simple, that’s not including: wipes, rash cream, or any other accessories (like Diaper Genie bags). So, you can imagine, it’s a conservative number. 
Now, for cloth. Let’s assume you use my first system (Flip covers + inserts):
  • 10 Flip covers: $150
  • 30 Stay Dry Inserts: $150
  • 8 changes per day for 2.5 years = $300
And that’s just for one kid (and doesn’t take into account the resale value!) Add in the savings you get by using cloth wipes instead of disposable wipes (about $400), and, even with the extra you may spend on water, energy, and accessories, it’s hard to argue with the financial benefits.

Speaking of benefits, there are tons of others beyond the money (more on that tomorrow), but I hope this was able to clarify some of the “bad” things you’ve heard about cloth and help you realize just how doable it can be!

Thanks for reading, y'all!