Pages

Thursday, February 28, 2013

Fifty-two

I left my phone at home this morning. Actually, I left my ENTIRE PURSE at home. It was one of those mornings. Anyway, I shot The Boy a note to let him know that I'd be incommunicado, and if he was looking for me, to try Facebook or email. 

At lunch, I ran home to get my bag. I pulled out my phone to discover FIFTY-TWO new messages. All from the same person. Any wild guesses who?

I proceeded to sit in the car and read through all 52 messages - and yes, they were unique messages, not just the same words copied and pasted over and over again. Here's a "snippet" (and this is only 15 of the 52!):


Ridiculous :)

Tuesday, February 19, 2013

Gift Giving with Geeks, Part 2


Alright, so we discussed what I GOT for Valentine’s Day, but I also promised a recap of what I GAVE.

Many of y’all that know me know that I used to be an avid scrapbooker. I LOVED it – and I made pages for everything. I no longer scrapbook (except for special occasions like milestone birthdays or big trips), but I haven’t been able to let go of that mindset completely.

In other words: I like keeping things like ticket stubs and programs.

I’ve started a new system where I stick these things in large mason jars labeled with years or names of trips. But, every now and then, a memory comes along that merits a bit more celebration.

Our first date was one of those moments.

I know I already made him something first-date-related for Christmas, but this felt different enough that I was okay with it.

This is what he got:


That’s the ticket stub from our first date.

Oddly enough, the trickiest part of making the pillow was stealing the ticket stub from his house (he kept it instead of me). I kinda accidentally found it one day. He has this box on his counter where he puts papers and what not, and one day I noticed a pile of my letters sitting in the box. I said “Hey, I recognize these!” and flipped through them. That’s when I saw it. I don’t even know if he meant to keep it or if he knew it was in there, but I was touched just the same.

I realized later, however, that if I wanted to use the stub…I was going to have to figure out a way to nonchalantly rifle through his things, steal it, and get it back in there without him noticing. It took a little while for me to stumble upon the right moments, but it worked out.

In addition to the pillow, I gave him a movie journal. 


This way, we can keep all of our ticket stubs from movies we see together – and preserve any special memories that go along with their viewing. 


Plus, he has a whole list of movies that I “have to see” that I haven’t yet, so as we watch through those, we can record them as well (on the “Watched at Home” cards). 

I went ahead and wrote reviews for the movies we've seen so far - now he just needs to go in and add his thoughts. This will be fun to look back through later. 

I was pretty proud of my gifts – and he seemed to like ‘em, so that’s a win.

Now, for those of you who are curious, here’s how I made the pillow. Enjoy!

DIY Ticket Stub Throw Pillow

What you’ll need:

  • 12x12 pillow form with cotton cover (I got mine at JoAnn)
  • Sewing machine
  • Light fabric transfer sheets (again, JoAnn)
  • Decent-res image of your ticket stub (I scanned mine and enlarged it in Word)
  • Iron
  • Scissors
  • Optional: Embroidery hoop, needle, and thread

Step 1: De-stuff your pillow, cut off the tags, flip the case inside out, and iron out any wrinkles.


Step 2: Using a printed image of your stub, mark the case down to the appropriate size. For a standard sized ticket stub, you’ll probably need to take a little more than an inch off of each “long” side. (I basically made my image about 8.5 x 11 for simplicity sake.)


Step 3: Sew the sides along your lines and flip the case right-side-out again. Iron out any new wrinkles.

Step 4: Print your image off onto the transfer paper. Make sure to print a MIRROR IMAGE of your stub or your transfer will be backwards. Following the package instructions, iron your image onto the cover.


Step 5: Restuff the pillow.


I also chose to embroider my pillow. I sign all of my letters to him the same way, so I wrote that out on the case (after sewing down, but before ironing on the transfer), then embroidered it using a hoop and DMC floss. I like the extra touch it adds.


Thanks for reading, guys! Let me know what you think!

Monday, February 18, 2013

Gift Giving with Geeks

I can finally tell you what I got for Valentine's Day!
Caveat: I'm a geek
Caveat 2: I'm dating a geek
Alrighty then.

This is what I got!!!


Isn't it fantastic?!?

What if I told you it made this noise when opened?


Still confused? It's okay. We understand that everyone can't be as adorably geeky as we are. So how 'bout a bit of explanation?

I might have a slight obsession with this video game:


In the game, the protagonist, Link, travels around the world of Hyrule trying to save the Princess Zelda from the evil Ganondorf (fairly simple plot). As he travels, he occasionally encounters treasure chests that contain fun items to help him in his quest.


Paul knows I love Zelda. As a matter of fact, I got something game-related for Christmas:


It's a charm bracelet with all the spiritual stones on it (Link has to collect these to get the Triforce...oh, don't worry about it, it's a long story)

Anyway, I LOVE it. He spent time making me a personalized gift related to something I love - jealous yet? The fact that the chest came filled with Reeses was just a happy bonus.

Oh, and just so you know, The Boy might even get to do a guest post to discuss the adventure that was creating said gift. Stay tuned for that! (note: he's a writer, so it'll prolly be way better than my normal posts).

I'll update again tomorrow with a post about what I gave HIM for Valentine's. Oh, and I still have to tell y'all about dinner! But let's focus on the adorable gift for today, shall we?

Til later, friends!

Friday, February 15, 2013

Valentine's Day


So, sweet readers, I know you’ve all been a bit anxious for an update on what I got for Valentine’s (since I’ve been alluding to it for about a week)…but that’s not what this post is about.

It’s better than that.

Last night, although I had a fabulous home cooked dinner by the cutest chef out there, I didn’t get my gift (thanks, Amazon…booo). I will, instead, get it on Sunday. I promise you’ll get a recap then. (If I have to wait, so do y’all – mwahaha).

I would, however, like to share a story from last night with you all.

First, some back-story.

A few weeks ago, I showed up at church SUPER excited about an idea I’d had in the shower that morning. See, I’d been lamenting the fact that, despite wanting to, I would not be able to pull off owning my own cupcake/cake/pie/marshmallow shop while still employed full time at a job I love (and am not willing to abandon to play baker). But, mid-shampoo, I realized I COULD – at the Farmers’ Market! I could open up a cute little booth and sell cute little cakes to cute little kids and it would be…cute (to say the least). Brilliant, right?

Well, I go to tell The Boy about it, and he responds with “Hmm, bet you have to have a license. And I bet there are permits. And a waiting period. And tons of other rules. And [a-thousand-other-reasons-it-won’t-work etc.]”

Um, thanks for the support, babe. Such a typical male, jumping straight to the logical side of things rather than just saying “Wow, Hun! That’s a fantastic idea! Let’s look into that!” (This is why I call Mom when I’m excited…)

I gave him a hard time for his response for the rest of the day (jokingly, of course, but still…), then we basically dropped it and haven’t talked about it much since. I decided I probably couldn't have pulled it off anyway. 

Fast forward to last night.

In the middle of the first course, I realize that sitting on the otherwise beautifully set table was a random manila envelope.


Not one to leave things alone, I asked what it was. He responded “Oh, that’s for you. It’s not your present, but I’ve been wanting to give it to you for a while now, and tonight just seemed like a good night. You can open it if you want.”

Uhhhh, yes please!

Then he went on to say that I had to open it exactly like he had it laid out and I had to let him explain each piece as I looked at it. Seemed easy enough.

This is what was in the envelope:


Guys, it’s an application, already filled out, to have a cupcake booth at the Bentonville Farmers’ Market.

Not only had this sweet, wonderful, amazing boy gone out and found the application, he’d done additional research on the rules and regulations and included an annotated vendor’s guide (marked up to call out the pieces that applied to vendors selling baked goods).

I just sat there and stared at the contents – lost somewhere between excitement and tears.

Then, I realized there was another small envelope in the packet.

This one:


That envelope contains a single blank check, filled out by him, to cover the booth fees for as many weeks as I want to be there.

At that point, the tears won out. Big time.

How incredibly blessed am I?

Sure, that “isn’t my present,” but what he gave me in that envelope meant more than anything I could have imagined I’d receive last night.

I couldn’t be happier. 

Thursday, February 14, 2013

My clues for Valentine's Dinner

Remember how I told you that The Boy mentioned he was making me a Valentine's gift? Turns out that he's ALSO making me dinner. And I'm not allowed to help. I'm simply to "show up and look pretty."

Well okay then.

I haven't been told anything specific about this dinner, but he did offer to give me several clues, one each day, starting last week.

Caveat (per his request): These are "not very thought out clues" and we "aren't to get [our] hopes up for something awesome." Nevertheless, they're clues and I'm curious. So, I'm sharing. 

  • Clue 1: "cranberry" 
    • Seems self-explanatory, right?
  • Clue 2: "fall" 
    • hmm, less obvious, but still not cryptic
  • Clue 3: An anagram: "Appreciated Lunatics" 
    • Note: He wasn't supposed to tell me it was an anagram - which would have made it SO MUCH TRICKIER - but he accidentally did. And I wasn't allowed to use Google to figure it out. It took me longer than I want to admit. Don't you cheat, either.
  • Clue 4: Ham's sexier cousin 
    • Context: Walmart was having a special on ham and he was confused by it's Valentine's Day connection. So he pointed out that we were NOT having ham, but rather it's "sexier cousin"
  • Clue 5: There are four courses. He will not be eating one of them, apparently.
    • I have no idea where he's going with that one.
  • Clue 6: It involves an apple.
    • ...ok
  • Clue 7: This video
    • I don't even...that...ummmmmmmmm?
He's also been slowly but cryptically telling me stuff about my gift. On Saturday, I got a photo of his dad and a few friends in his dad's shop...around a work table. He called them his "crew" and said he was paying in beer.

Then, he said it involved multiple steps being carried out over multiple days. 

Also, I went to lunch with him on Tuesday and he had to go pick up a part from a store down the street (I kept my eyes closed to avoid spoiling any surprises...I have no idea where we went, but I know the general area...none of the stores around there sell obvious "supplies" for anything...). 

And yesterday, he had to make an emergency run to Toys R Us to pick up a last minute replacement part for one that didn't arrive in time. Toys R Us, folks. Toys R Us. 

Everyone else as lost as I am?

I'm sure it'll all make sense later. Stay tuned for updates on what I got and a post on what I gave him (which turned out SUPER cute, y'all).

Til then, friends.

Friday, February 8, 2013

"You're My Hero"

Apparently we're THAT couple that makes stuff for each other.

I realized this as I was putting together The Boy's Valentine's present and thinking "Oh hey, I should take pictures so I can show everyone how I did this!"

Then I realized I couldn't show y'all...cause, well, he hasn't seen it yet.

I also realized I'd had that thought before, back when I was making his Christmas present. I took pictures of that process, too, and since he HAS seen that one, so can y'all.

Have you seen Wreck It Ralph? If not, you should. It's adorable.

It was also what we did on our first date, so I might be biased.


Anyway, in the movie, the cute little protagonist gives the big burly protagonist a medal made from cookies and candy. Did I mention this movie is adorable?


I loved that moment. It's just such a sweet plot point. I decided that MY big burly protagonist needed his own medal. So that's what he got for Christmas. At first I was just going to make him cookies to look like the medal...but then I realized he wouldn't have one to keep. So, I also made him a "keeper" medal out of Sculpy clay. Tutorials for each are below.

"You're My Hero" Cookies


Step 1: Make your favorite sugar cookies.


Step 2: Roll out the dough and, using a large cookie cutter, make as many heart-shaped cookies as desired. Bake per recipe instructions and let cool COMPLETELY.


Step 3: Outline the edge of the cookie with white royal icing.


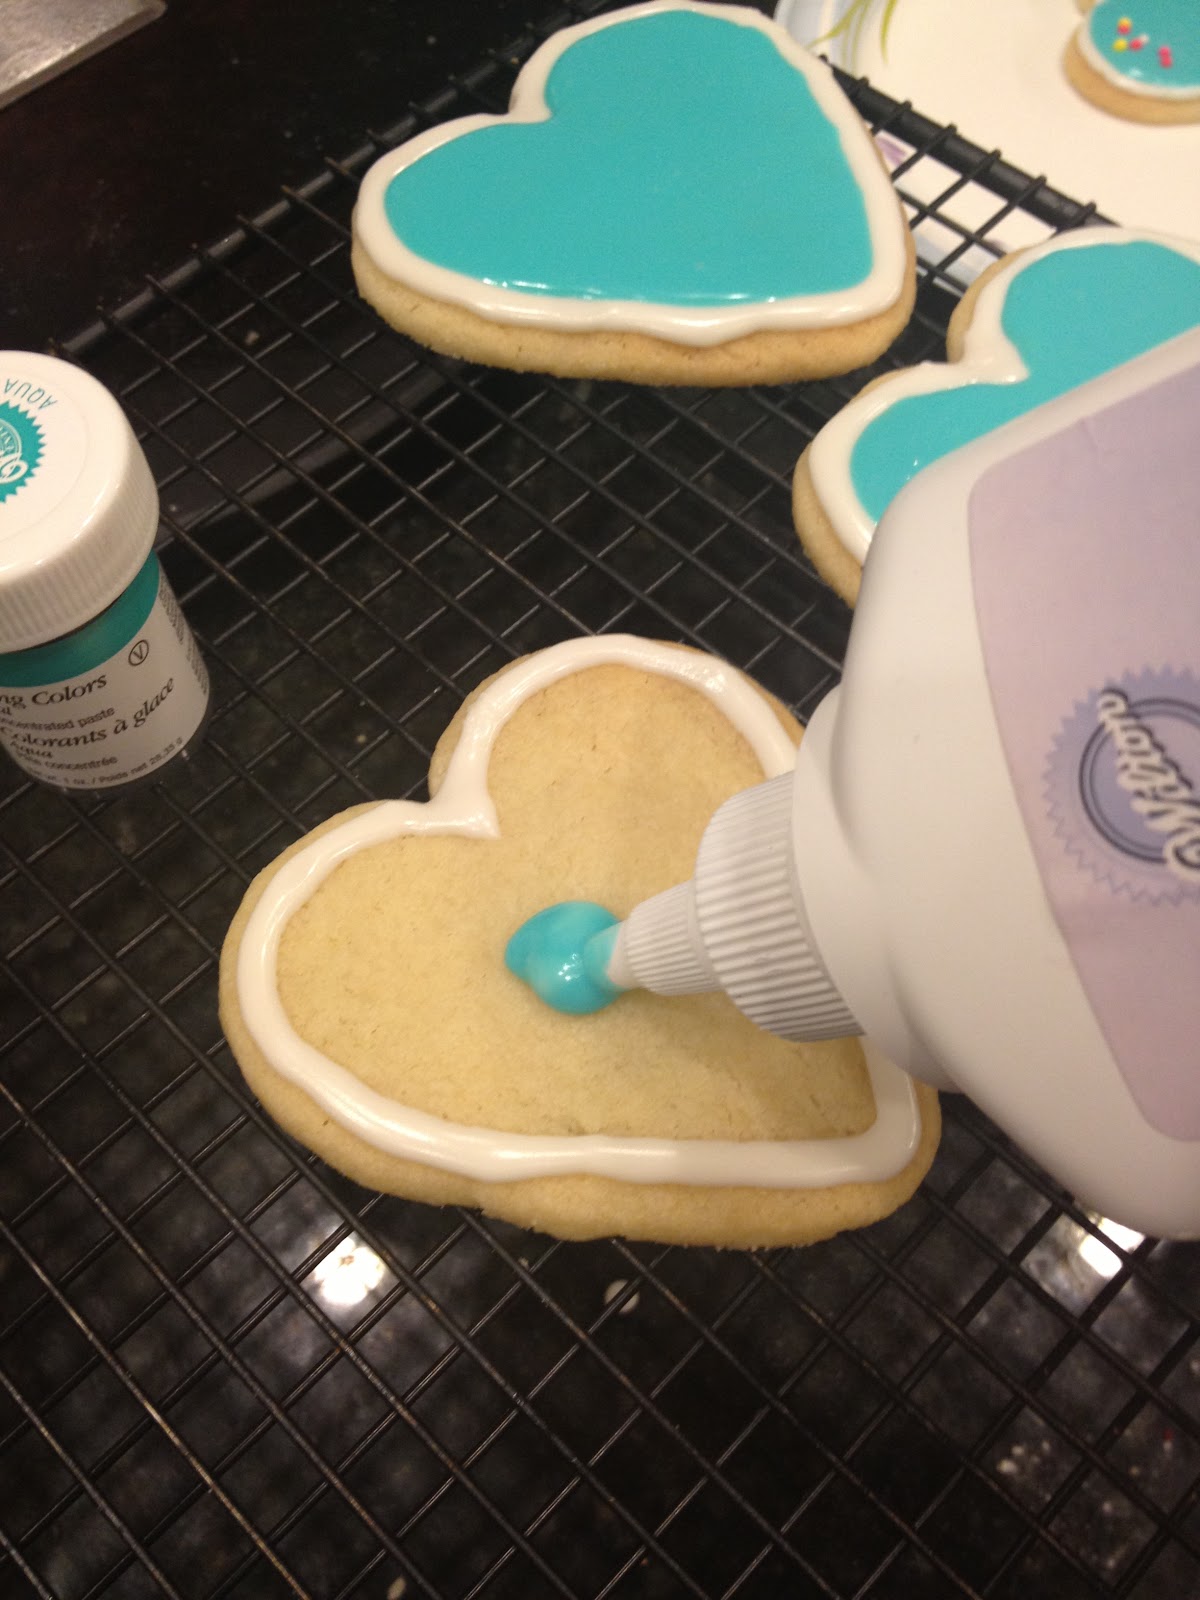
Step 4: Tint your icing a bright teal color. I used Wilton cookie icing and Wilton icing color in teal.


NOTE: Those colorings are POWERFUL. Tint using a teeeeeeny amount at a time until you reach your desired color. I used a toothpick, dipped it into the dye, then swirled the dipped pick into the icing bottle. I then shook and massaged the bottle to distribute the color. It only took two swirls of the toothpick to achieve the color you see.

Step 5: Once the outline has hardened completely, gently flood the center of the cookies with the teal icing.


NOTE: This part can be tricky. The outline on the first cookie I tried to fill wasn’t hardened well enough and I ended up with a leaky disaster.

To avoid that, be a bit more patient than it am, and use less icing than you initially think you will need. It WILL spread out. you can help it a little with a toothpick  or the tip of the bottle if you need to.

Step 6: Starting with the cookie you iced first, gently place sprinkles on the cookie.


NOTE: The sprinkles were a labor of love. I started with a multi-colored bottle, but, since I’m a perfectionist, I only wanted to use the colors used in the movie (pink, yellow, and white). So, I painstakingly (with the help of my mother) separated out the appropriate colors then hand placed them on the cookies. 


If you want to save yourself some time, you can just wing it. I’m sure it’ll look fine.

Step 7: Let your iced cookies sit for AT LEAST one hour. Then, using very stiff white royal icing and a teeeeeny icing tip, pipe the words onto each cookie. Allow finished cookies to sit til hardened.


Step 8: Using a couple dots of royal icing and sour gummy ropes, create the medal ribbon.


NOTE: I got my ropes at the candy store in the mall (but Amazon has the same ones). They come in all sorts of colors. The sour powder on the ropes makes them resemble the glittery candy ribbon used in the movie.

Step 9: Package your cookies and deliver to the lucky recipient!


"You're My Hero" Clay Medal


Step 1: Using a mixture of white and tan clay, create a “baked sugar cookie” color – enough to create a three inch heart shape (I used a cookie cutter as a mold). I didn’t want it to be too perfect since it’s supposed to be a cookie, so I left the lumps and bumps that formed as I flattened it into shape.


Step 2: Using a mixture of white and turquoise clay, create the teal color of the cookie. You’ll need less than you needed for the cookie base since this just forms the icing on top. Press the clay out into a heart shape a little smaller than the base and press the pieces together. (Don’t worry about the edges, you’ll cover those next). Wash your hands after handling the teal so as to avoid tinting the white used next.


Step 3: Using white clay, form a very thin rope and outline the teal clay. Gently press into the base of the cookie.


Step 4: Using the same white clay and the same thickness rope, form the letters on the cookie, gently pressing into the teal clay. (Tip: work with shorter lengths of rope if you’re having trouble controlling the curves and shapes.)


Step 5 (optional): Using chocolate clay, form another heart similar to the teal heart. Use this space, and the same white ropes as used in the above steps, to address your medal to the recipient. This piece will be placed on the back of the medal once baked.


Step 6: Using small plastic or glass beads, press your “sprinkles” into the teal clay. I got my beads at Hobby Lobby and picked out the appropriate sizes and colors from the bag. Also, if you’ve made a back piece, dust the brown clay with a little bit of glitter (again, optional).


Step 7: Place your pieces on parchment paper and bake according to clay package directions. Allow to cool completely.

Step 8: Cut a length of ribbon (in the movie it’s pink and glittery) and, using hot glue, attach the ribbon to the back of the beige base. Then, using additional hot glue, attach the back piece over the ribbon.


Step 9: Package your medal and present to your favorite hero.